
Article summary
I’ve long wanted to have more control/flexibility in my home network, and 2020 finally gave me the justification to make some upgrades. While there’s no question the Unifi Dream Machine Pro is overkill for a home network, it was just the combination of power, control, and convenience I’d been looking for.
With the UDM Pro, I had a real gateway, and I no longer needed my AT&T BGW210-700 gateway/router to handle any of the services it was previously performing. Unfortunately, some research showed that I couldn’t drop the AT&T router entirely; it was providing the authentication for my internet service.
My research indicated that I’d want to enable “bridge mode” on my router, but it turns out the BGW210-700 doesn’t have support for a true bridge mode*. The closest it comes to a bridge mode is its “IP Passthrough” mode.
I found Reddit posts and Help/Support pages that got me most of the way there. But I still got a few things wrong along the way, so I thought I’d document what my BGW210-700 configuration looked like when I finally got my UDM Pro assigned the public WAN IP address.
DHCP
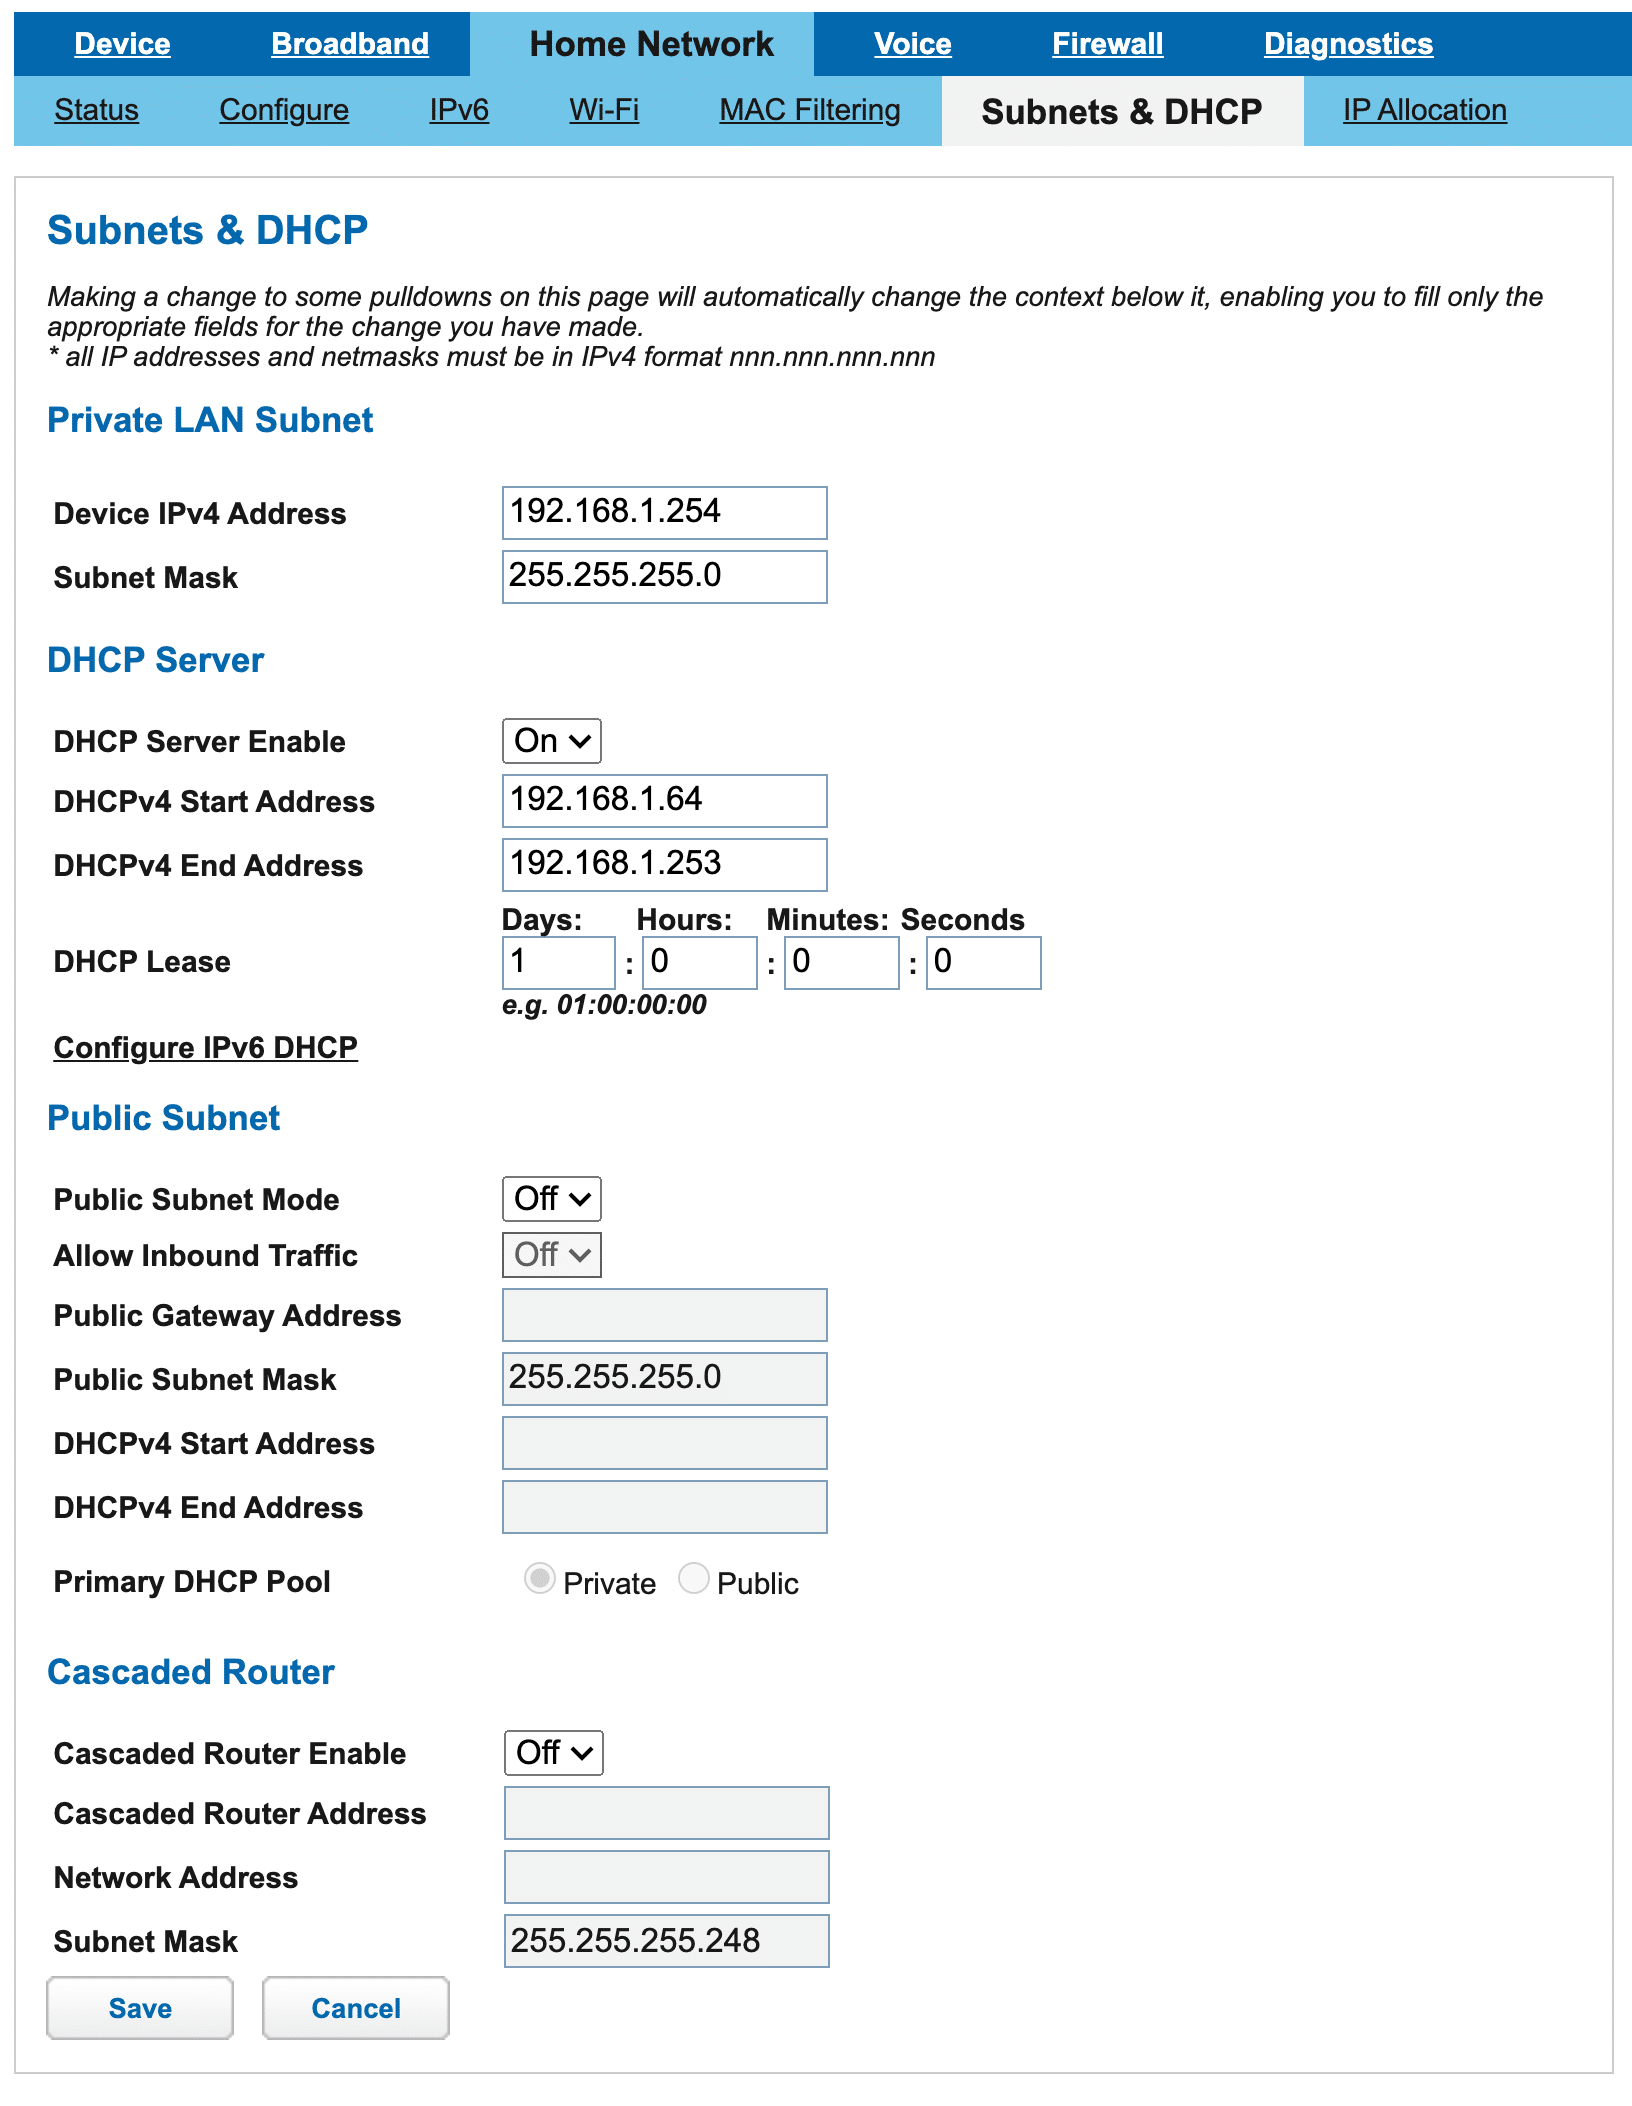
What worked for me was to leave DHCP enabled, Public Subnet off, and Cascaded Router off.
Firewall Filters
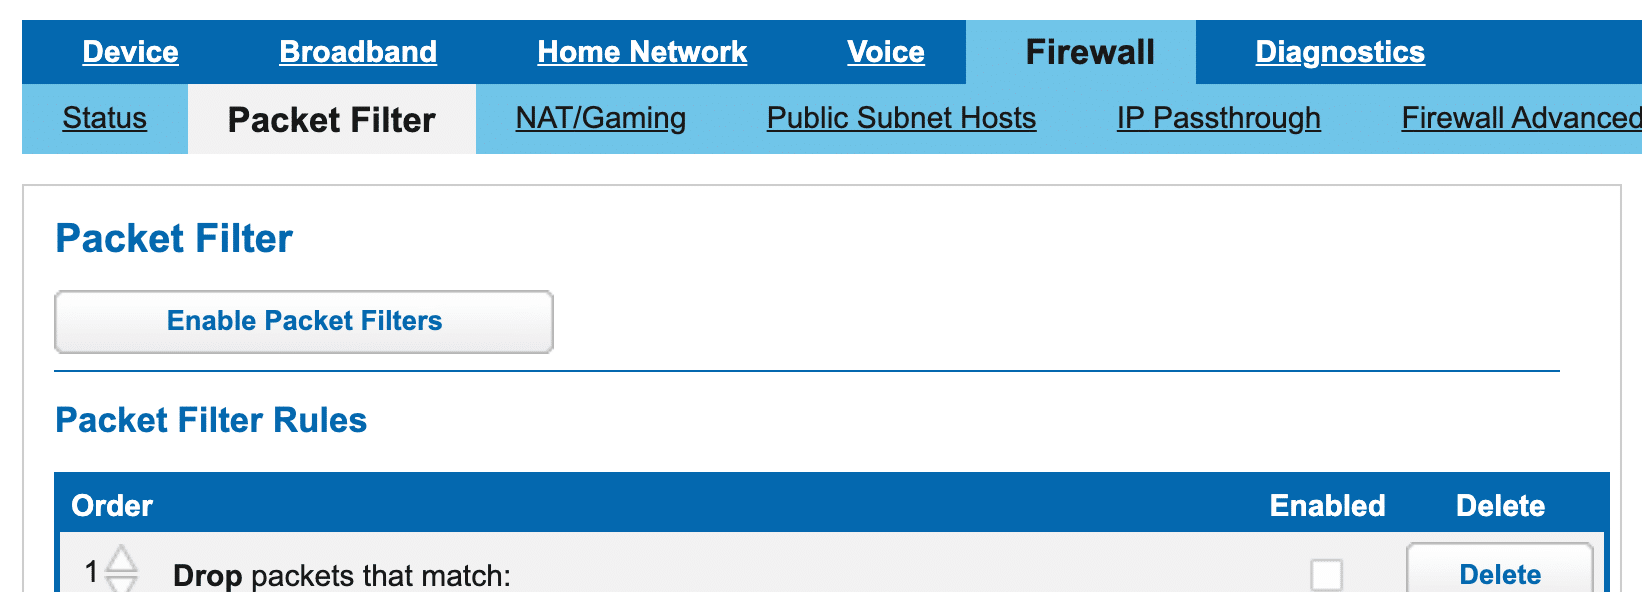
I wanted the UDM Pro to provide all of the firewall filtering, so I disabled the filters on the Firewall | Packet Filter tab. This is what it looked like when I was done:
I also turned off all of the “advanced filters” on the Firewall | Firewall Advanced tab.
IP Passthrough
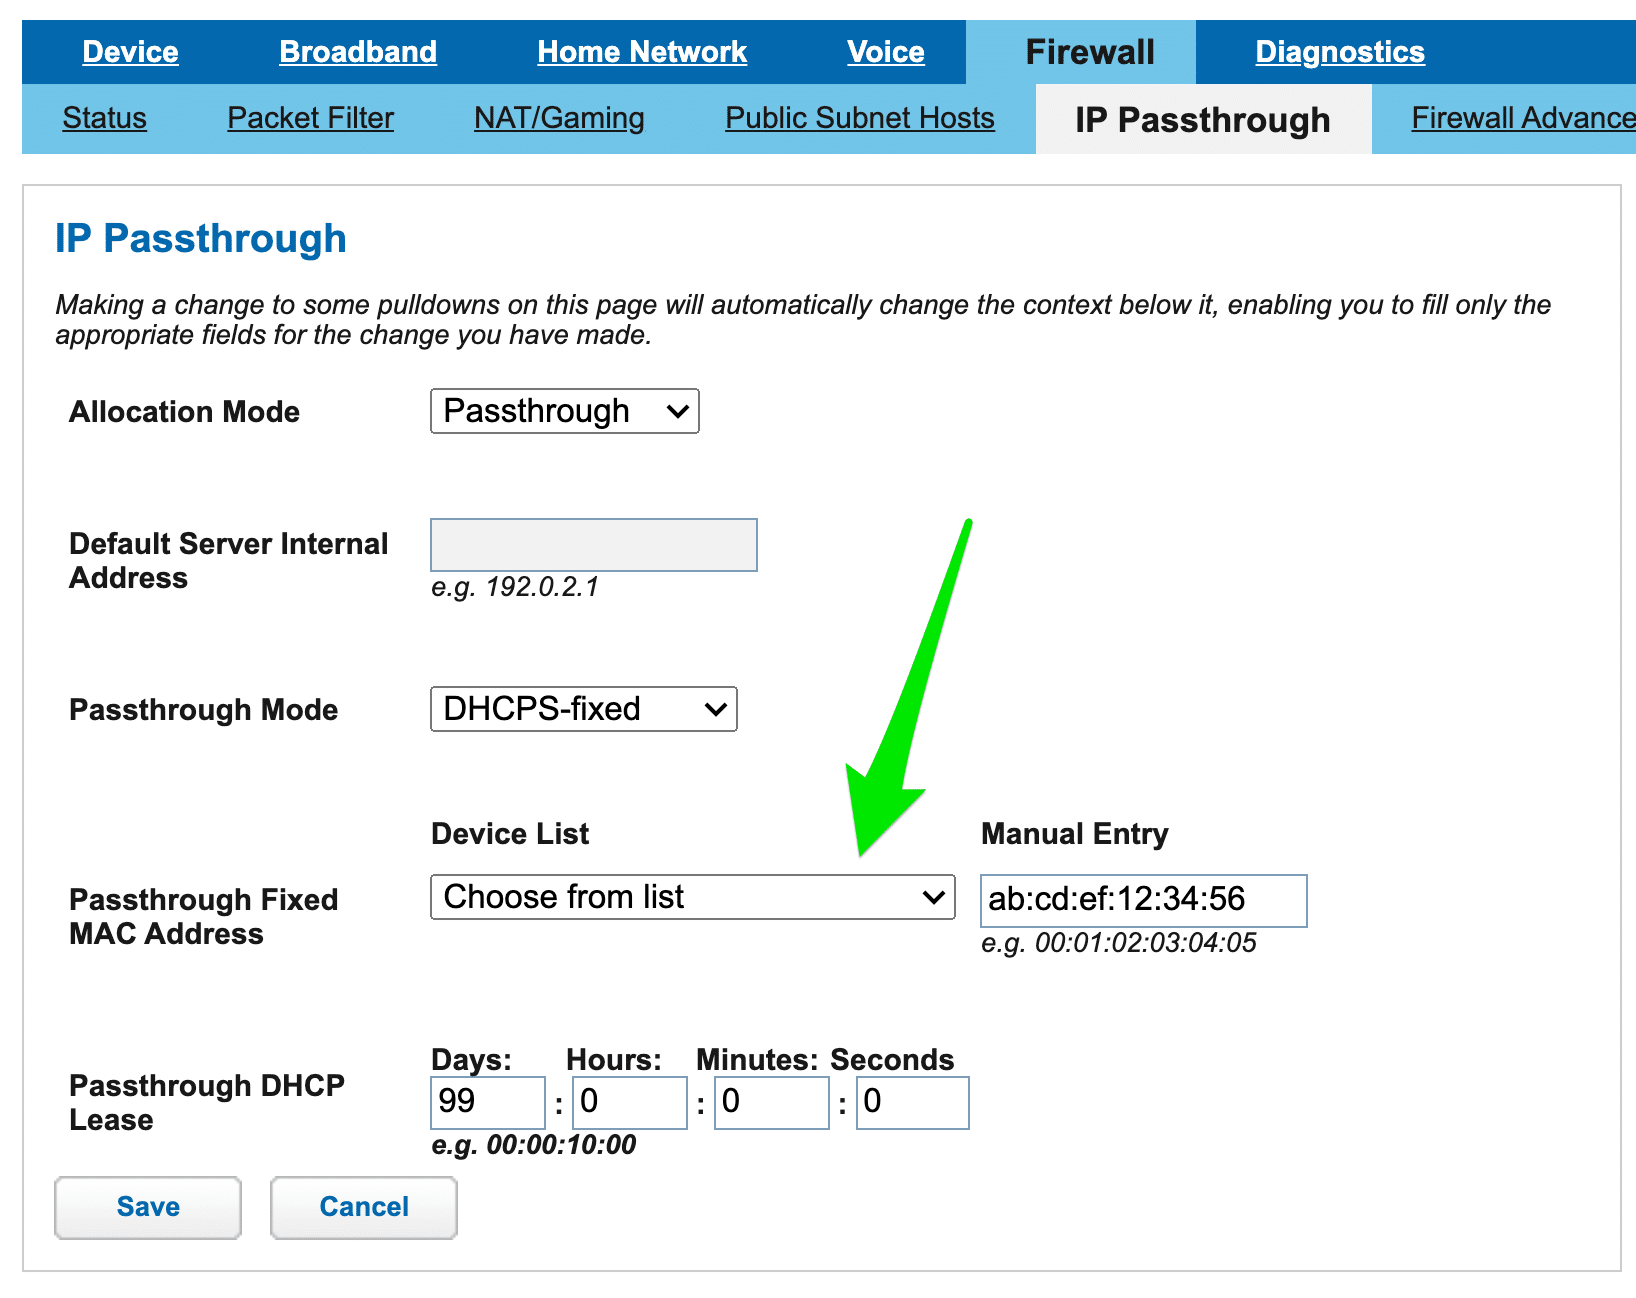
The Firewall | IP Passthrough tab was, obviously, the most important page in this process. I needed to set the Allocation Mode to “Passthrough” and the Passthrough Mode to “DHCPS-fixed,” then select the Passthrough Fixed MAC Address from the list of devices.
The Passthrough Fixed MAC Address is what actually tripped me up the most. The instructions I’d been following indicated that I needed to type in the MAC address of the router I wanted the passthrough to go to (the UDM Pro, in my case). I looked in the Devices section of the Unifi Controller web interface and used the MAC address in the form.
But after restarting the BGW210-700 (from the Device | Restart Device tab) and then restarting the UDM Pro, the UDM Pro was still getting a 192.168.1.x IP address — not the public WAN IP address.
It turns out the MAC address displayed in the Unifi Controller interface is not the WAN1 MAC address. To get the right MAC address, I used the “Clear and Rescan for Devices” button on the BGW210’s Device | Device List tab. After scanning, I saw two devices: the laptop I had plugged into the router that I was using to make the changes, and the UDM Pro.
Going back to the Firewall | IP Passthrough tab, I now saw that same MAC address in the dropdown. I selected it, saved the changes, restarted the BGW210 again, and then finally restarted the UDM Pro. (I never did find a way to restart it other than pulling the power.)
When it came back up, it had the public WAN IP address. Success!
Firewall Status
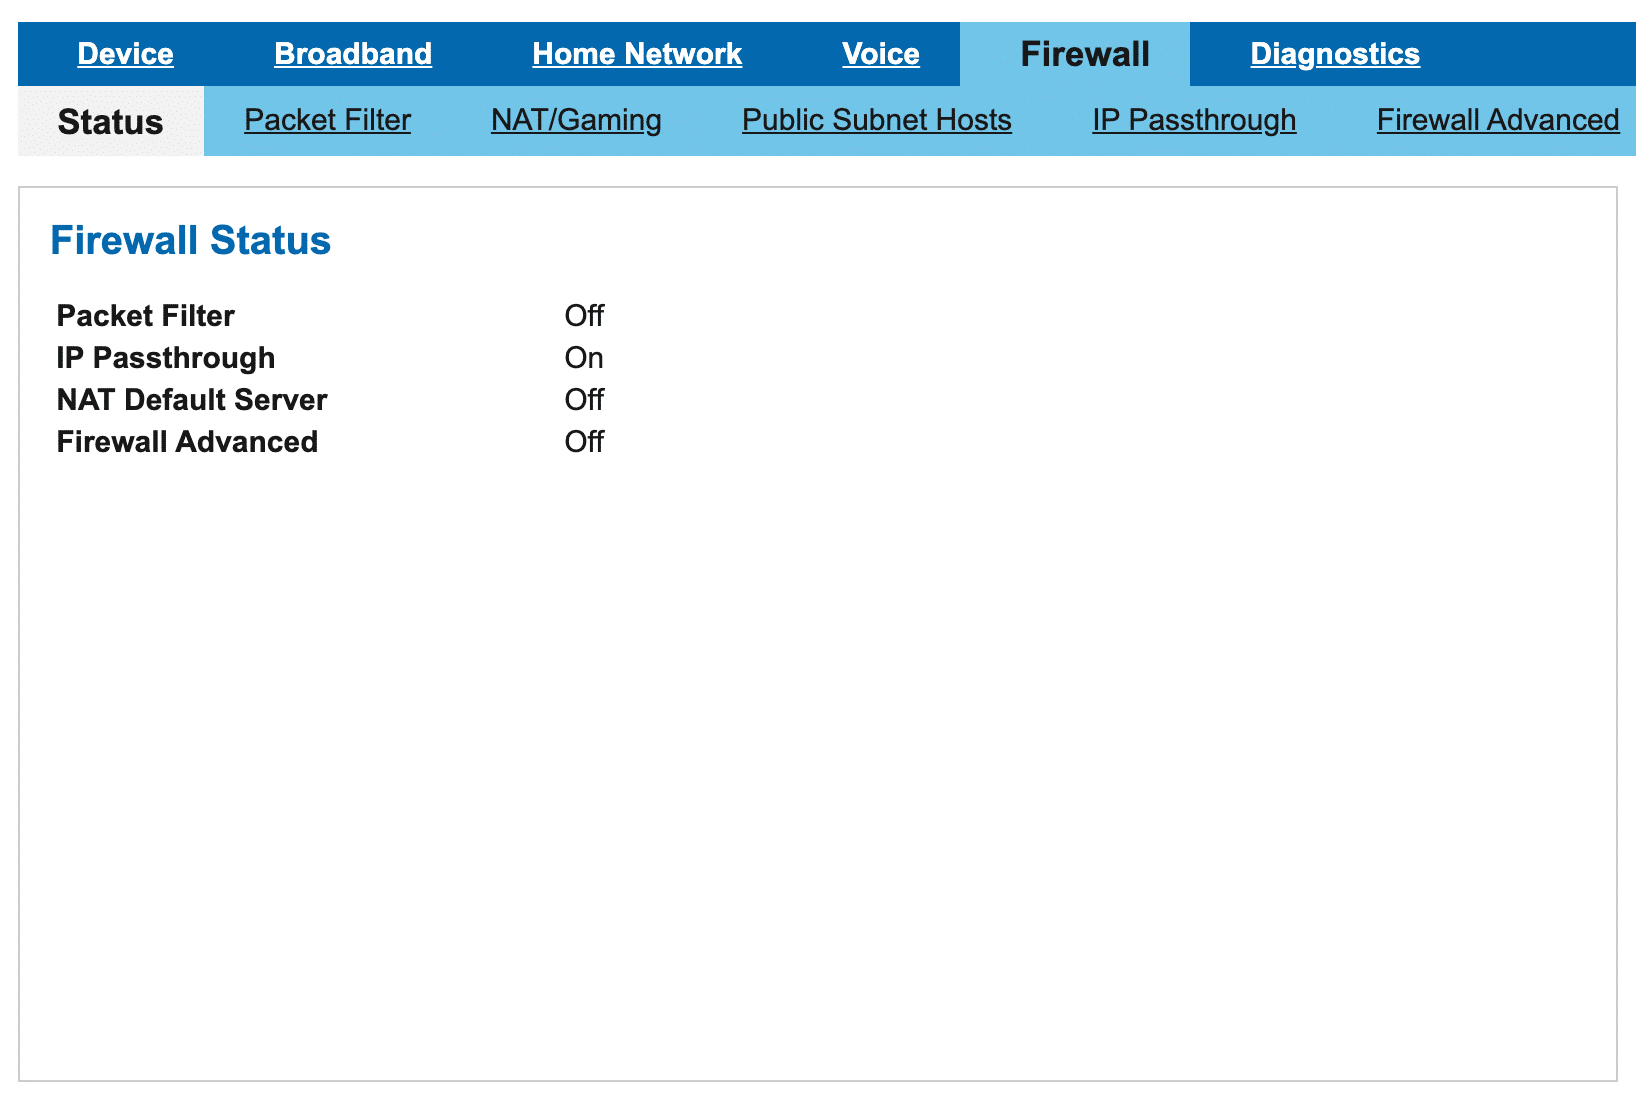
This is what the Firewall | Status tab looked like when everything was working:
Wi-Fi Configuration
Lastly, I turned off both the 2.4 GHz and 5 GHz Wi-Fi networks on the Home Network | Wi-Fi tab. This isn’t necessary for IP Passthrough, but I no longer wanted devices connecting directly to the AT&T router at all, so I turned it off entirely.
*True Bridge Mode
While it’s true that the BGW210-700 doesn’t support a real bridge mode, there are a couple of workarounds that people have come up with — at least one of which, the
So far, the IP Passthrough mode has been working well enough for me, but if I start to see a deterioration of performance over time, I’ll be looking into the eap_proxy workaround.
Hey thanks for posting this. I did this a while ago myself but noticed degraded throughput. From JefferMC in a related article: https://forums.att.com/conversations/att-fiber-equipment/bgw320500-bridge-mode-andor-ip-passthrough-question/6026fd40eda6ec07a853e0da?page=1
“Based on reports from users on these forums: When you turn on IP Passthrough to a router, it appears that the connection from the Router to the Gateway is slowed down such that traffic doesn’t flow as fast as either one is capable of. This is only noticeable for Fiber service, if you’re below 200 Mbps, there doesn’t seem to be a drop off (e.g. for my VDSL2 connection, it doesn’t hurt at all). The Gateway maintains a session in the NAT table for the traffic, even though it’s not actually performing NAT. Those who have added a Public Static have reported it ran faster than their IP Passthrough traffic ran previously.”
Wondering if you had the same observation?
Hi Howard,
How degraded was your output?
For the first couple months of using this setup my UDMP’s daily speed tests were showing download speeds of > 950 Mbps. But in the last month they’ve been trending down closer to 800 Mbps. My AT&T gateway has not been restarted since I set this up, so I’ve been wondering if that might be all that’s needed.
And thank you for sharing that forum thread! It sounds like the “Cascaded Router” is a better way to go – but it requires a static IP address which I don’t have (and unless I see a drastic drop in speeds I don’t think I’d be willing to pay for).
If a gateway restart doesn’t help my slowing speeds I think I’ll try the “eap_proxy-udmpro” technique.
Thanks for posting this, Patrick. The IP Passthrough and Firewall settings work for me just as you set them. I have a DHCP question for you.
While trying to set up something similar, I saw conflicting information about whether the AT&T gateway and the 3rd party router need to be on the same or different subnets. The AT&T router’s default address is 192.168.1.254 and it serves addresses on that subnet. What scheme does your Unifi Dream Machine’s DHCP server use?
I use a Lynksys WRT1200AC with Open-WRT and in my experience, different ranges of the same subnet did not work. I had to change the scheme of my 3rd party router radically. I tried 192.168.2.x without luck and switched to a 10.0.0.x scheme instead.
Hi Alex,
I’m using something in the 10.x.x.x range for the addresses my UDM’s DHCP server is handing out.
I could definitely see how there could be problems trying to use the same exact range as the AT&T router (192.168.1.x), but I guess I don’t know enough to fully understand why you’d have trouble with 192.168.2.x. That being said, I very intentionally went with something in the 10.x.x.x range to try to avoid any issues – and that has worked very well for me.
Thanks for putting this together. The part that has me still confused is the passthrough MAC address. The address of my udmp isn’t showing in the drop down (I think). In the udmp dashboard I’m finding the udmp MAC in the “overview” tab.
Reread your instructions, and rebooted everything. Now it works.
Excellent! Glad to hear it was helpful. :-)
Patrick, you’re a genius! Thank you very much and saved me a lot of time and agony. My only problem now is that after all day of good and steady connection, i wanted to check in on my router (Asus RT-AC3100). It takes forever to load and when it does it seems to timeout.
Thoughts?
Thanks Armando! Glad you found this helpful!
Are you trying to connect to the router using its internal subnet IP address (not the public WAN IP address)? I would expect that you could still access your router at http://192.168.1.1 (assuming you did not change your router’s internal subnet).
Hey Patrick,
Yes, trying to connect to the internal (in my case, 192.168.2.1). I quickly get the interface but when I sign in, it takes forever and then times out. I guess I could reboot my router and see what it does. I’ll provide a quick update after that.
So the reboot fixed it. I’ll continue to monitor if the same thing occurs as it did yesterday.
Thanks!
Thank you for this post. It was perfect. I had the same modem so it was great to follow along. Appreciate your post. Have a great one!
Forgive the rather basic question but: using this method which connection ports do you use to connect the router to the Arris BGW 210
Hi Steven,
I have a cable going from the first of the BGW210’s yellow ethernet ports (although any of the 4 ports should work fine) to the “RJ45 Internet” port (labeled with the number 9 on the front) on the UDM Pro.
Hi Patrick, care to provide an update on how your throughput has looked since configuring? Still maintaining >950 MBPs? How often have you needed to restart to fix degraded speeds?
Cheers!
Martin
Hi Martin – I have yet to restart the BGW210 in the nearly year since I put this in place. The UDM Pro’s built in speed test shows results that are kind of all over the place. Over the last month they do seem to be dropping, but I’m not sure that’s related. As recently as October they were still in the mid 900s frequently.
However, if I load https://fast.com right now (in Safari) it reports 1.0 Gbps – so it seems like it’s still doing just fine!
Well, maybe worked but still strange results. I have AT&T fiber at 300 Mbps up and down. At install, I had over 300 down and 140 up. Testing by the TP-Link Router AX11000 and speedtest.net. I did all the above and testing by router, no change in upload speed, but testing by speedtest.net, upload is now over 300 and testing by AT&T is over 300.
So really I don’t know why the differance between the router and direct by Internet.
After I made the changes, I did a power off, then on to the modem and router.
Guide was perfect. Key is to get the MAC address of the WAN port specifically! Thanks!
This was the exact information I needed to read. I reviewed the steps for 5 minutes, followed them in order, and had my new mesh router system up and running in about 30 minutes total. The web interface screens for the BWG210-700 were excellent. Thank you!
Thanks for creating the clearest instructions on the Internet for this task. I followed your instructions precisely with my new ASUS RT-AX86U router. Everything worked like a charm. There was a moment of panic when the BGW210-700 took forever to join the AT&T network after reboot but eventually it did so I was able to continue.
I’ll add two points for any future readers:
1. There are contradictory instructions on various sites about whether one should change the IP range in the DHCP setup but I stuck with your screens. The ASUS router defaulted to 192.168.50.xx in its DHCP setup so that was fine.
2. I thought the on/off toggle for WiFi would be on the main WiFi screen but it’s in the Advanced section.
Glad it was helpful Richard, and thanks for sharing those tips!
“When it came back up, it had the public WAN IP address. Success!”
For those of us needing explicit instructions, please help us understand what we are looking for in order to determine if the public WAN IP address has been set correctly. Is the address the same for all people? Is it listed in the ATT Modem? Thanks. Screen shot may be helpful.
Hi Carlton,
You can check the WAN (public internet) IP address in the AT&T BGW210-700 interface by looking at the “Broadband” tab. The “Broadband IPv4 Address” is the one you want to look at. I found a screenshot from another site that shows what that page looks like:
https://prod-content-care-community-cdn.sprinklr.com/d80f176d-2bd5-487b-b539-b24b3ede5ed6/2020091113_26_46BroadbandStatu-bc148cbb-4517-4456-b9b0-7accdffe8fd8-1148845855.png
That’s the IP address you want your internal router (in my case a UDM Pro) to be assigned (as its WAN IP). With the current version of Unifi that I’m running that’s shown as “WAN IP (Port 9)” in the upper left hand corner of the Dashboard page.
Another way to get your public IP address, assuming you have things working enough to get out to the internet, would be to google “what is my ip address”. The results page will tell you what your public IP is, and if things are configured correctly that will match what the AT&T interface has for “Broadband IPv4 Address” and then what your internal router has for its WAN IP as well.
Hope that helps!
Thanks so much, this article same me from going nuts. It finally worked after finding this article, and following these steps. Please don’t take the page down.
Glad you found it helpful!
I setup a BGW320 using the instructions above and got it working so TY. With this device when you scan for devices it shows the mac address and manufacturer, so finding the USG was easy. Mac address for the USG is also on a label on the bottom of the unit.
I set the modem to 192.168.2.254 and the DHCP range as 192.168.2.64 to 2.253.
My USG is set to 192.168.1.1 and DHCP range 192.168.1.2 to 192.168.1.253.
When I try to connect to the modem @192.168.2.254 from inside the 192.168.1.x network, it wont connect. I have to attach to one of the ports on the back of the modem, get a 2.x address from the modem and then configure.
Am I missing something or perhaps I need a router to route between the subnets?
Hi Steven,
Glad the post was helpful.
I was under the impression that it wasn’t going to be possible to communicate with the external modem/router (the BGW) from inside the internal router’s network. Other than double checking things for responding to comments on this post, I haven’t needed to connect to the router at all since I got this setup, so it hasn’t really been an issue for me.
Those couple of times I did need it, I plugged a laptop directly into the BGW, as you described.
I can’t say with certainty that it’s not possible, and I’m definitely no networking expert – but given that the BGW is just acting as a straight passthrough (not doing any kind of NAT), I’m not sure how it would work.
Going back to my networking days, I would say that to you would need to have a Layer 2 router, to route between the subnets.
I wonder if you could leave the modem at 192.168.1.254, set the DHCP range on the modem tp 192.168.1.150..200, then the USG could exist at 192.168.1.1 with a DHCP range of say192.168.1.5..149.
Hi Patrick,
Thanks for the posting! I am trying to connect my UDM Pro to the BGW210 to get the internet because I just switched to AT&T. My expected connection is BGW210->UDM Pro->USW PoE->APs. I followed all the steps but got stuck at the step of figuring out the MAC address for the UDM Pro. I tried the “clean and rescan the devices” button as you mentioned but I cannot find the UDM Pro listed there. I am using the WAN port 9 of the UDM Pro. I can guarantee there are no issues with the UDM Pro as everything is working great with my current ISP. Could you please help if you know how to resolve this? Thank you so much!
Hi Zedd,
If you’ve got the UDM Pro connected to the BGW210, it really should show up in the list of devices when you “clean and rescan”. Do any devices show up in that list? Any you don’t recognize?
Since that worked for me, I never had to try any other techniques to get the WAN MAC, but I did find this question/answer that gives instructions for how it can be done:
https://community.ui.com/questions/Get-the-MAC-for-UDM-Pro-Wan/33afbacc-54a8-487f-94f0-e645019babc4
Hopefully that helps.
Hi Patrick,
Thanks for your reply. I finally successfully connected my UDM Pro. Fortunately, I found a more straightforward way to find the WAN MAC address without having to get it from the device list. The MAC displayed in the Unifi settings or on the UDM Pro screen is the MAC for port 1. As we need the address for port 9 which is the WAN port, we can add the last two hex number digits by 8 to get the correct MAC address (remember is hex number calculation). Hope it will help someone who runs into the same issue in the future.
Hi Patrick,
Thanks for your reply. I finally successfully connected my UDM Pro. Fortunately, I found a more straightforward way to find the WAN MAC address without having to get it from the device list. The MAC displayed in the Unifi settings or on the UDM Pro screen is the MAC for port 1. As we need the address for port 9 which is the WAN port, we can add the last two hex number digits by 8 to get the correct MAC address (remember it is hex number calculation). Hope it will help someone who runs into the same issue in the future.
Great tip! I’m sure that’s going to help people out. Thanks for sharing.
Appreciate the instructions as this was very helpful for me to setup my UDM Pro with AT&T fiber.
Thank you for the detailed instructions! I was able to get the public IP to my own router behind AT&T’s router.
One thing I’d emphasize in the instructions is that it’s necessary to reboot *both* routers, the AT&T one and my own one.