 Java, Spring and Web Development tutorials  1. Overview
Testing is an essential part of the application build process. Of course, it takes time, so we should look for ways to speed it up. The obvious way is to leverage multi-core processors and run tests in parallel.
In this tutorial, we’ll learn how to perform parallel testing with Gradle.
2. The Gradle Setup
Throughout this article, we’ll use Gradle version 9.
First, let’s set it up for parallel testing. We’ll start with the gradle.build file:
plugins {
    id 'java-library'
}
test {
    maxParallelForks = (int) (Runtime.runtime.availableProcessors() / 2 + 1)
    useJUnitPlatform {
        includeTags testForGradleTag
    }
}
repositories {
    mavenCentral()
}
dependencies {
    testRuntimeOnly 'org.junit.platform:junit-platform-launcher'
    testImplementation 'org.junit.jupiter:junit-jupiter:5.10.0'
}
Note the maxParallelForks property set to the number of threads that will execute the tests in parallel. We use the Java Runtime availableProcessors() function to assign half and one available cores for tests.
Next, with the useJUnitPlatform property, we invoke and configure the JUnit 5 test environment. We use includeTags to allow filtering tests by the @Tag annotation. To complete the configuration, we need to set the Gradle testForGradleTag property to its default value. Let’s do that in the gradle.properties file:
testForGradleTag=serial
With this default setting, we’ll run only tests marked with the @Tag(“serial”) annotation. It’s an optional setting designed to make the testing more straightforward for us. It has nothing to do with Gradle test forking.
3. How It Works
To understand how parallel testing works, let’s create a test class called UnitTestClass1.
First, let’s prepare the functions to measure the execution time of a particular test and the whole suite:
@Tag("parallel")
@Tag("UnitTest")
public class UnitTestClass1 {
    private long start;
    private static long startAll;
    @BeforeAll
    static void beforeAll() {
        startAll = Instant.now().toEpochMilli();
    }
    @AfterAll
    static void afterAll() {
        long endAll = Instant.now().toEpochMilli();
        System.out.println("Total time: " + (endAll - startAll) + " ms");
    }
    @BeforeEach
    void setUp() {
        start = Instant.now().toEpochMilli();
    }
    private LocalTime localTimeFromMilli(long time) {
        return Instant.ofEpochMilli(time)
          .atZone(ZoneId.systemDefault())
          .toLocalTime();
    }
}
Next, let’s add four test methods, annotated with @Test. We name them whenAny_thenCorrect1() through whenAny_thenCorrect4(). Here is the first one:
@Test
public void whenAny_thenCorrect1() throws InterruptedException {
    Thread.sleep(1000L);
    assertTrue(true);
}
At this moment, they’re identical and do nothing but sleep for one second.
Finally, the tearDown() method provides test statistics:
@AfterEach
void tearDown(TestInfo testInfo) {
    long end = Instant.now().toEpochMilli();
    String name = testInfo.getDisplayName();
    System.out.println("Test " + name + " from class " + getClass().getSimpleName() +
      " started at " + localTimeFromMilli(start) + " ended at " + localTimeFromMilli(end) +
      ": (" + (end - start) + " ms)");
}
We report both the test display name and the test class name to track the execution order.
3.1. One Test Class
To test only one class, let’s change the annotation of UnitTestClass1 to serial:
@Tag("serial")
@Tag("UnitTest")
public class UnitTestClass1
Then, we can start this class test with Gradle:
$ ./gradlew -i cleanTest test -PtestForGradleTag=serial | grep "Test whenAny"
We start ./gradlew with the -i option for the info debug level. Then we filter the output of the tearDown() method with grep. Let’s study this output:

We see that individual test methods are run in serial, one after another. It’s clearly visible when we compare the start times of subsequent test methods, in the yellow frame.
3.2. Many Test Classes
To benefit from the parallel testing, we need many test classes, not methods. So, let’s just copy our UnitTestClass1 three times. We number new classes from 2 to 4 and ensure they’re annotated with @Tag(“parallel”). Then, we start the test again:
$ ./gradlew -i cleanTest test -PtestForGradleTag=parallel -PtestForGradleTag=UnitTest | grep "Test whenAny"
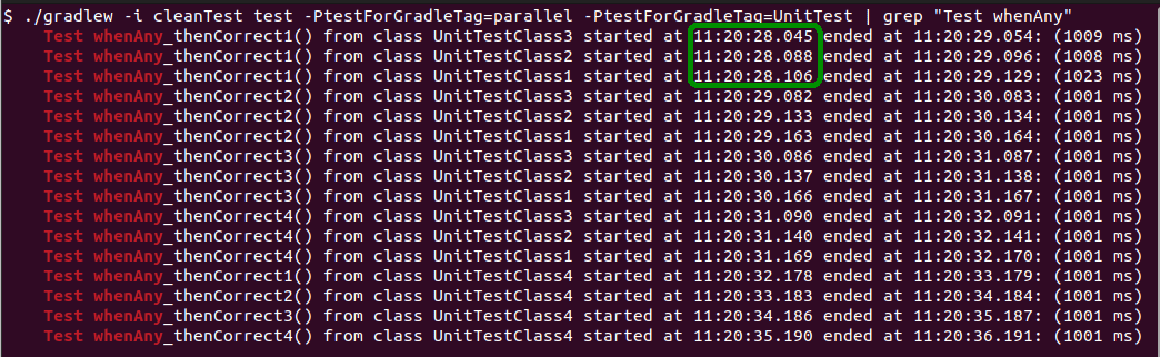
Now we have 16 test runs. When we go through the logs in chronological order, we see that test methods of different classes started almost simultaneously. So, Gradle runs three threads in parallel. On the other hand, if we sort out the output of one class, we find out that its methods are called in serial, as in the example with one class.
4. Working With Resources
When the test calls for a resource, we should guarantee a clear distinction between independent test runs. Let’s take a look at a simple class designed to create a folder:
public class FolderCreator {
    Boolean createFolder(Path path, String name) throws IOException {
        String newFolder = path.toAbsolutePath() + name;
        File f = new File(newFolder);
        return f.mkdir();
    }
}
The mkdir() function returns false if folder creation failed. It may happen if the folder already exists.
4.1. The Integration Test
Let’s test this method with the TestFolderCreator1 test class. As we interact with the operating system, we tagged this test as integration:
@Tag("parallel")
@Tag("integration")
public class TestFolderCreator1 {
    //time reporting helper functions as in UnitTestClass1
    private Path baseFolder = Paths.get(
      getClass()
      .getResource("/")
      .getPath());
    private Integer workerID = Integer.valueOf(System.getProperty("org.gradle.test.worker", "1"));
    private String testFolderName = "/" + "Test_" + workerID;
    @BeforeEach
    void setUp() {
        start = Instant.now().toEpochMilli();
        //preemptive clean up with helper function
        removeTestFolder();
    }
    private void removeTestFolder() {
        File folder = new File(
          baseFolder.toFile()
          .getAbsolutePath() + testFolderName);
        folder.delete();
    }
}
The structure of this class is similar to that of UnitTestClass1. However, in the setUp() method, we ensure that the test folder doesn’t exist, preemptively removing it.
Now let’s look at the test function whenCreated_ThenCorrect():
@Test
void whenCreated_ThenCorrect() throws IOException, InterruptedException {
    FolderCreator folderCreator = new FolderCreator();
    assertTrue(folderCreator.createFolder(baseFolder, testFolderName));
    Thread.sleep(1000L);
}
It asserts that the folder creation is successful. Unlike in the previous example, we have only one test function now.
Finally comes the tearDown() function:
@AfterEach
void tearDown(TestInfo testInfo) {
    long end = Instant.now().toEpochMilli();
    System.out.println(
        "Class " + getClass().getSimpleName() + " checks folder " + testFolderName +
          " started at " + localTimeFromMilli(start) + " ended at " + localTimeFromMilli(end) +
          ": (" + (end - start) + " ms)");
    //clean up with helper function
    removeTestFolder();
}
Note that this function removes the test folder after each test run. This is enough housekeeping in the serial testing scenarios.
4.2. Multiple Workers for Parallel Test
In a parallel case, we need to ensure that different threads don’t try to create the same folder. We accomplished that by reading the worker ID, set by Gradle in the org.gradle.test.worker system property:
System.getProperty("org.gradle.test.worker", "1")
With this ID, we could make up different folder names for each working thread.
As before, we create four copies of this class. Then, we run the test passing the additional integration tag to ./gradlew:
$ ./gradlew -i cleanTest test -PtestForGradleTag=parallel -PtestForGradleTag=integration | grep "Class TestFolder"
Let’s track the dependency between the test folder name and the worker thread in the output:

We see that during one parallel run with three threads, each class has its own worker ID. However, after the worker pool is exhausted, ID equal to 373 is reused.
5. The Static Horror
Now, let’s examine an example of testing the function that relies on the application’s static state. We’ll use a simple Singleton pattern implementation:
public final class ClassSingleton {
    public String info = "Initial info class";
    private static ClassSingleton INSTANCE;
    private static int count = 0;
    private ClassSingleton() {
    }
    public static ClassSingleton getINSTANCE() {
        return INSTANCE;
    }
    public int getCount() {
        return count;
    }
    public static ClassSingleton getInstance() {
        if (INSTANCE == null) {
            INSTANCE = new ClassSingleton();
        }
        count++;
        return INSTANCE;
    }
    // more features below ...
}
We see the count field, which accumulates how many times the instance of ClassSingleton is requested.
Then, we’ll want to test if this counter is set correctly. So, let’s do that with:
@Test
public void whenOneRequest_thenSuccess() throws InterruptedException {
    ClassSingleton testSingleton = ClassSingleton.getInstance();
    assertEquals(1, testSingleton.getCount());
    Thread.sleep(1000L);
}
This test will fail. Or it will not fail. Or sometimes it fails, and sometimes it doesn’t. Playing with the number of test classes and threads, we can see that it’s simply unpredictable, therefore somewhat useless.
5.1. How to Fix It
This behaviour arises because static variables are defined within the Java Virtual Machine (JVM) scope. Such a virtual machine is started separately for each thread. However, test classes may retake the same thread. So, we can’t expect count to be equal to one if we run the testSingleton() function multiple times.
To make things even worse, we made count a private field and provided no setter for it. Therefore, we have no way to set the singleton state before the test (no matter how much sense it’d make).
Gradle comes to the rescue with the forkEvery property, which says how often the new thread should be started. If we set it to one, each test class will have its own thread and also its own JVM. To set this property, we need to edit the ‘test‘ section in the gradle.build file:
test {
    maxParallelForks = (int) (Runtime.runtime.availableProcessors() / 2 + 1)
    forkEvery = 1
    useJUnitPlatform {
        includeTags testForGradleTag
    }
}
Now our singleton test will always succeed. Moreover, this feature isn’t limited to parallel testing. If we touch on the static context in many test cases, we may also need it in the serial testing scenarios. We only need to locate tests in different classes.
Finally, we should be aware that starting a new JVM for each test class slows down the tests. We can disable this feature by setting forkEvery to 0, which is its default value.
6. Conclusion
In this article, we learned how to run parallel tests in Gradle. First, we configured Gradle for such a task. Then, we examined how the tests are performed. Based on this, we concluded that tests are parallel based on the test class rather than the method.
Next, we took a look at cases that are particularly troublesome in parallel testing. This included access to resources and handling the static state of the tested application. We saw how Gradle mitigated these problems.
Finally, we can regard parallel testing with Gradle as well-suited to speed up independent test runs.
As always, the code for the examples is available over on GitHub. The post Parallel Testing With Gradle and JUnit 5 first appeared on Baeldung.
Content mobilized by FeedBlitz RSS Services, the premium FeedBurner alternative. |