 Java, Spring and Web Development tutorials  1. Introduction
In this tutorial, we’ll implement transaction-based routing with Spring, sending write operations to a primary database and read-only operations to a replica. This is a common pattern in applications that use database replication to scale read speeds.
2. Why Route Transactions?
Without routing, every query hits the same database. This might become a bottleneck as traffic grows, so replication helps by maintaining replicas that mirror the primary database. This strategy increases read speeds, but the application still needs to know where to send each query. The approach we’ll use lets the transaction metadata decide automatically:
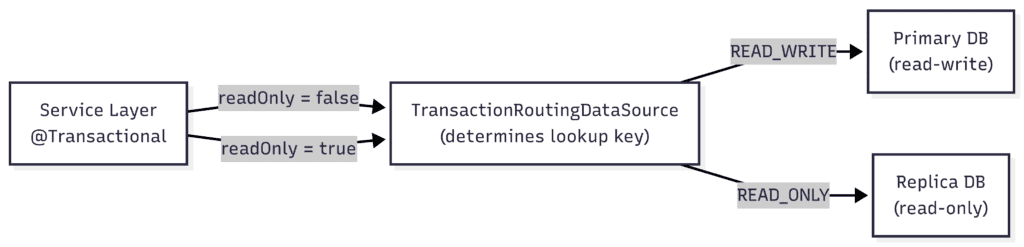 Using Spring’s AbstractRoutingDataSource, combined with the @Transactional annotation’s readOnly flag, we intercept every connection request and direct it to the suitable database. Using Spring’s AbstractRoutingDataSource, combined with the @Transactional annotation’s readOnly flag, we intercept every connection request and direct it to the suitable database.
3. Scenario Setup
Let’s start with a simple entity and a repository for the examples. This layer doesn’t need any special configuration.
3.1. Creating the Entity
Let’s start with an Order entity with basic properties. We explicitly set the generation strategy to IDENTITY so the database’s auto-increment column provides the ID:
@Entity
public class Order {
    @Id
    @GeneratedValue(strategy = GenerationType.IDENTITY)
    private Long id;
    private String description;
    // default getters and setters and constructors
}
3.2. Creating the Repository
Next, we’ll create a Spring Data repository:
public interface OrderRepository
  extends JpaRepository<Order, Long> {
}
We now have everything we need to implement our routing datasource.
4. Implementing the Routing DataSource
We’ll extend AbstractRoutingDataSource to decide which DataSource to use based on the current transaction.
4.1. Defining the DataSource Types
First, let’s create an enum to represent our DataSource types when wiring up our configuration:
public enum DataSourceType {
    READ_WRITE, READ_ONLY
}
We’ll use READ_WRITE as the lookup key for the primary DataSource (where all inserts, updates, and deletes go) and READ_ONLY for the replica (used exclusively for select queries).
4.2. Creating the Routing Logic
Now, we’ll extend AbstractRoutingDataSource and override determineCurrentLookupKey(). This method checks whether the current transaction is read-only via TransactionSynchronizationManager:
public class TransactionRoutingDataSource extends AbstractRoutingDataSource {
    @Override
    protected Object determineCurrentLookupKey() {
        boolean readOnly = TransactionSynchronizationManager
          .isCurrentTransactionReadOnly();
        if (readOnly) {
            return DataSourceType.READ_ONLY;
        }
        return DataSourceType.READ_WRITE;
    }
}
Spring calls this method when a connection is needed, so we’ll use it for routing the request to either the primary or the replica.
5. Configuring the DataSources
We need to define the properties for both data sources, then wire them as beans. Note that this setup only controls which connection is used for a given transaction. Nothing in the routing layer prevents a write from being issued to the replica connection, since this enforcement is configured at the database level.
In the real world, that means the replica user is typically granted only SELECT privileges, or the replica database itself is configured to reject writes.
5.1. Defining the Application Properties
Let’s use the “spring.datasource” prefix to define connection properties in application.properties:
spring.datasource.readwrite.url=jdbc:h2:mem:primary;DB_CLOSE_DELAY=-1
spring.datasource.readwrite.username=sa
spring.datasource.readwrite.driverClassName=org.h2.Driver
spring.datasource.readonly.url=jdbc:h2:mem:replica;DB_CLOSE_DELAY=-1
spring.datasource.readonly.username=sa
spring.datasource.readonly.driverClassName=org.h2.Driver
Each data source points to its own in-memory H2 database. We set DB_CLOSE_DELAY to -1 so these aren’t dropped when the last connection closes.
5.2. Wiring the Configuration Beans
Because we’re defining a custom DataSource bean, Spring Boot’s JPA auto-configuration isn’t used. That means OrderRepository won’t have an EntityManagerFactory or TransactionManager unless we explicitly declare them. The @EnableJpaRepositories annotation lets us point the repository scanner at the beans we’ll define in this class:
@Configuration
@EnableTransactionManagement
@EnableJpaRepositories(
  basePackageClasses = OrderRepository.class,
  entityManagerFactoryRef = "routingEntityManagerFactory",
  transactionManagerRef = "routingTransactionManager"
)
public class DataSourceConfiguration {
    // ...
}
The basePackageClasses attribute extracts the package name from the class we provide for component scanning. So that it can scan everything we need, OrderRepository and Order must be in the same package.
We start by creating both DataSource beans from their respective properties prefixes. First, reading “spring.datasource.readwrite.*” properties:
@Bean
@ConfigurationProperties("spring.datasource.readwrite")
public DataSourceProperties readWriteProperties() {
    return new DataSourceProperties();
}
Then, reading “spring.datasource.readonly.*” properties:
@Bean
@ConfigurationProperties("spring.datasource.readonly")
public DataSourceProperties readOnlyProperties() {
    return new DataSourceProperties();
}
Next, we build the actual DataSource instances. First, for the read-write source:
@Bean
public DataSource readWriteDataSource() {
    return readWriteProperties()
      .initializeDataSourceBuilder()
      .build();
}
Then, for the read-only source:
@Bean
public DataSource readOnlyDataSource() {
    return readOnlyProperties()
      .initializeDataSourceBuilder()
      .build();
}
5.3. Configuring Our TransactionRoutingDataSource
Now, we wire the routing DataSource in a TransactionRoutingDataSource bean:
@Bean
public TransactionRoutingDataSource routingDataSource() {
    TransactionRoutingDataSource routingDataSource =
      new TransactionRoutingDataSource();
    // ...
    return routingDataSource;
}
We’ll register both targets in a map, which we’ll use when calling setTargetDataSources():
Map<Object, Object> dataSourceMap = new HashMap<>();
dataSourceMap.put(DataSourceType.READ_WRITE, readWriteDataSource());
dataSourceMap.put(DataSourceType.READ_ONLY, readOnlyDataSource());
routingDataSource.setTargetDataSources(dataSourceMap);
routingDataSource.setDefaultTargetDataSource(readWriteDataSource());
We also call setDefaultTargetDataSource(), which defines the fallback to use when, for example, code runs outside a transaction.
5.4. Defining a Lazy DataSource
Since JPA acquires a connection before the transaction synchronization sets the read-only flag, we need to wrap our routing DataSource in a LazyConnectionDataSourceProxy. This way, the actual connection is deferred until the first SQL statement:
@Bean
@Primary
public DataSource dataSource() {
    return new LazyConnectionDataSourceProxy(routingDataSource());
}
We mark this bean with @Primary so that when auto-wiring a DataSource, there’s no chance the non-lazy routingDataSource() is used. Then, we configure an EntityManagerFactory to use our lazy proxy. LocalContainerEntityManagerFactoryBean is the standard choice when managing the JPA configuration manually, as it integrates with Spring’s lifecycle:
@Bean
public LocalContainerEntityManagerFactoryBean routingEntityManagerFactory(
  EntityManagerFactoryBuilder builder) {
    return builder
      .dataSource(dataSource())
      .packages(OrderRepository.class)
      .build();
}
We also need a TransactionManager wired to our factory. We return a JpaTransactionManager so that @Transactional methods propagate the transaction manager’s readOnly flag to our routing logic:
@Bean
public PlatformTransactionManager routingTransactionManager(
  LocalContainerEntityManagerFactoryBean routingEntityManagerFactory) {
    return new JpaTransactionManager(
      Objects.requireNonNull(routingEntityManagerFactory.getObject()));
}
After all this configuration, we’re ready to get to the service layer.
6. Creating the Service Layer
We’ll create a service that uses the @Transactional annotation to control routing:
@Service
public class OrderService {
    @Autowired
    OrderRepository orderRepository;
    // ...
}
Methods annotated with readOnly = true are routed to the replica, while other transactions go to the primary DataSource:
@Transactional
public Order save(Order order) {
    return orderRepository.save(order);
}
@Transactional(readOnly = true)
public List<Order> findAllReadOnly() {
    return orderRepository.findAll();
}
@Transactional
public List<Order> findAllReadWrite() {
    return orderRepository.findAll();
}
In this example, we have a find method for each DataSource. This will be useful later in our tests.
7. Setting up the Tests
In a real-life scenario, a replica continuously syncs data from the primary. But to keep tests simple, we’ll keep them unsynchronized. We’ll use this isolation to assert that routing is working correctly.
So, in our case, if a read-only query returns data written by a read-write transaction, we know it’s hitting the primary rather than the replica.
Let’s set up our test class:
@SpringBootTest
class TransactionRoutingIntegrationTest {
    @Autowired
    OrderService orderService;
    // ...
}
First, we verify that a read-write transaction stays on the primary database, so a saved order is immediately visible:
@Test
void whenSaveAndReadWithReadWrite_thenFindsOrder() {
    Order saved = orderService.save(new Order("laptop"));
    List<Order> result = orderService.findAllReadWrite();
    assertThat(result)
      .anyMatch(o -> o.getId().equals(saved.getId()));
}
Then, we confirm that a read-only transaction is routed to the replica. Because the replica is a separate, unsynchronized database, it can’t access an order saved to the primary DataSource:
@Test
void whenSaveAndReadWithReadOnly_thenOrderNotFound() {
    Order saved = orderService.save(new Order("keyboard"));
    List result = orderService.findAllReadOnly();
    assertThat(result)
      .noneMatch(o -> o.getId().equals(saved.getId()));
}
We explicitly check that findAllReadOnly() doesn’t return the saved order’s ID, verifying that this specific order wasn’t routed to the replica.
8. Considerations
Let’s go over a few practical aspects to keep in mind when using this routing pattern.
8.1. Replication Lag
There’s a delay between a write to the primary and its propagation to the replica. The duration of the delay depends on our infrastructure.
So, for time-sensitive flows (such as writing an entity and immediately reading it back), routing the read to the replica may return stale data. In cases like this, it’s safer to run both operations within a single read-write transaction.
8.2. Nested Transactions
With Spring’s default propagation, a @Transactional(readOnly = true) method called from within a @Transactional(readOnly = false) method uses the existing transaction. This means only the first transaction created takes effect, ignoring any other flags in subsequent @Transactional methods, so the query still goes to the primary database. To actually route the inner call to the replica, we’d need Propagation.REQUIRES_NEW to suspend the outer transaction and start a read-only one.
Also note that if both methods are in the same bean, Spring won’t intercept the internal call.
8.3. Multiple Read Replicas
It’s also possible to use more than one read replica to distribute traffic. One approach is to extend our routing logic to rotate between them by using a list of read-only DataSources and selecting one using a round-robin implementation in determineCurrentLookupKey(), but that’s out of scope for this article.
A more robust approach is to delegate read-only connections to a load-balanced connection URL. There are many production-ready alternatives for this, like PgBouncer or ProxySQL, depending on our infrastructure.
9. Conclusion
In this article, we implemented transaction-based DataSource routing with Spring using AbstractRoutingDataSource. We saw how to separate read-write and read-only traffic, why LazyConnectionDataSourceProxy is required for correct routing, and how to verify the behavior with integration tests. The post Read-Write and Read-Only Transaction Routing With Spring first appeared on Baeldung.
Content mobilized by FeedBlitz RSS Services, the premium FeedBurner alternative. | 