 Learn all about Computer Science  1. Introduction
Deep learning has opened up new possibilities in the world of creativity by enabling computers to recognize images and generate art. One of the techniques in this space is the neural style transfer, a deep learning technique, allowing creators and users to blend the content of an image with the artistic style of another.
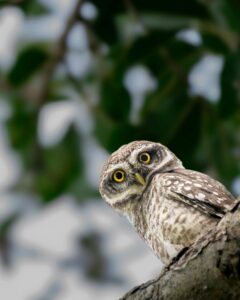
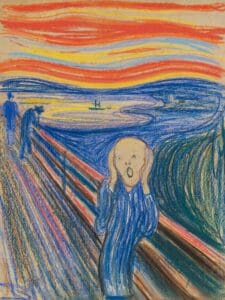
In this tutorial, we’ll learn how to transfer an artist’s style to an image using TensorFlow and a pretrained VGG16 model. We’ll extract content and style features from an Expressionism painting style called “Scream” by Edvard Munch, define a loss function that guides stylization, and optimize the image to transfer style to the image of an owl.
2. Configuration and Setup
Let’s begin by defining the key parameters for the style transfer process, including the image dimensions, style and content weight, and number of iterations.
#import libraries and modules
from __future__ import print_function
import time
from PIL import Image
import numpy as np
from keras import backend
from keras.models import Model
from keras.applications.vgg16 import VGG16
from scipy.optimize import fmin_l_bfgs_b
import imageio
#define parameters
CONTENT_IMAGE_PATH = './image_to_style.jpg'
STYLE_IMAGE_PATH = './artistic_image.jpg'
IMG_HEIGHT = 512
IMG_WIDTH = 512
STYLE_WEIGHT = 1e2
CONTENT_WEIGHT = 1e3
TOTAL_VARIATION_WEIGHT = 1e-6
NUM_ITERATIONS = 50
Let’s discuss the key parameters:
- STYLE_WEIGHT: defines how strongly the artistic style is applied to the image
- CONTENT_WEIGHT: establishes how much of the original image structure is preserved
- TOTAL_VARIATION_WEIGHT: adds smoothness, reduces noise
3. Image Preprocessing
Before passing images to our model, we need to ensure that we convert them into the right format that the model will understand. The following functions help with loading the image, preprocessing based on the VGG16 requirements, and postprocessing to display output:
3.1. Load and Process Image
The function below loads the image from the input file path using the PIL library and resizes the image to fit the dimensions as specified in the configuration above. This is because VGG16 requires a fixed input size:
def load_and_process_image(path):
    img = Image.open(path).resize((IMG_WIDTH, IMG_HEIGHT))
    img = tf.keras.preprocessing.image.img_to_array(img)
    img = np.expand_dims(img, axis=0)
    return vgg16.preprocess_input(img)
The load_and_process_image() function returns the resized image, formatted as a batch, which is now ready to be passed into the model.
3.2. Deprocess Image and Show Image
The deprocess function reverses the preprocessing we applied to the image before feeding it to the model by adding back the pixel value and converting it into a displayable format:
def deprocess_image(img):
    img = img.reshape((IMG_HEIGHT, IMG_WIDTH, 3))
    img[:, :, 0] += 103.939
    img[:, :, 1] += 116.779
    img[:, :, 2] += 123.68
    img = img[:, :, ::-1]
    return np.clip(img, 0, 255).astype('uint8')
def show_image(img):
    plt.imshow(img)
    plt.axis('off')
    plt.show()
The deprocess_image() function reverses the preprocessing previously applied by the load_and_preprocess_image() function. It first reshapes the image into standard height format, restores the pixel values, and clips all the pixel values to a valid range, converting the array to uint8 type, making it displayable. On the other hand, the show_image() function displays the deprocessed image.
Here’s a sample of our input image:
Here’s a sample of our artistic image:
As mentioned earlier, the VGG16 model, which is pre-trained on ImageNet, is used for the style transfer. We selectively extract features from intermediate layers for capturing content and style:
def get_model():
    vgg = vgg16.VGG16(include_top=False, weights='imagenet')
    vgg.trainable = False
    style_layers = ['block1_conv1', 'block2_conv1', 'block3_conv1', 'block4_conv1']
    content_layers = ['block4_conv2']
    outputs = [vgg.get_layer(name).output for name in (style_layers + content_layers)]
    return Model(inputs=vgg.input, outputs=outputs), style_layers, content_layers
In the above function, we defined the model object. Convolutional layers like block1_conv1 to block4_conv1 capture the texture and brushstroke patterns, and the content layer block4_conv2 preserves the spatial structure. These layers combine into a new model to display the required output.
5. Style and Content Representations
Now, that we’ve built the model, the next step is to extract the style and content representation from the respective images. Let’s compute the Gram matrix for the style to capture the correlations between feature maps and summarize the texture:
def gram_matrix(tensor):
    result = tf.linalg.einsum('bijc,bijd->bcd', tensor, tensor)
    input_shape = tf.shape(tensor)
    num_locations = tf.cast(input_shape[1] * input_shape[2], tf.float32)
    return result / num_locations
def get_feature_representations(model, content_image, style_image, style_layers, content_layers):
    style_outputs = model(style_image)
    content_outputs = model(content_image)
    style_features = [gram_matrix(output) for output in style_outputs[:len(style_layers)]]
    content_features = [output for output in content_outputs[len(style_layers):]]
    return style_features, content_features
We use the gram_matrix() in the get_feature_representation() function to extract and store both the style and content features from the input images.
6. Defining the Loss Function
The loss function is the heart of style transfer. It ensures that the generated image mimics the texture of the artistic image. It also ensures that it preserves the structure of the content image and regularizes the image to reduce noise and artifacts:
def compute_loss(model, loss_weights, init_image,
  gram_style_features, content_features, style_layers, content_layers):
    style_weight, content_weight = loss_weights
    model_outputs = model(init_image)
    style_output_features = model_outputs[:len(style_layers)]
    content_output_features = model_outputs[len(style_layers):]
    style_score = 0
    content_score = 0
    for target_style, comb_style in zip(gram_style_features, style_output_features):
        style_score += tf.reduce_mean(tf.square(gram_matrix(comb_style) - target_style))
    for target_content, comb_content in zip(content_features, content_output_features):
        content_score += tf.reduce_mean(tf.square(comb_content - target_content))
    style_score *= style_weight / len(style_layers)
    content_score *= content_weight / len(content_layers)
    total_variation = tf.image.total_variation(init_image) * TOTAL_VARIATION_WEIGHT
    loss = style_score + content_score + total_variation
    return loss, style_score, content_score, total_variation
The compute_loss() function evaluates how well the current image (init_image()) balances the desired style and content features. First, it passes the init_image() through the model to extract style and content features, and then it calculates the style loss by comparing the Gram matrices of the current image style features with that of the target image.
The output of the compute_loss() function returns:
- style_score: this measures how much the generated image imitates the texture of the style image
- content_score: this measures how much the generated image preserves the structure of the content image
- total_variation_score: this regularizes the image to reduce noise
7. Optimization and Stylization
Now that we have computed the loss and have a good score across the compute_loss() output, let’s define an optimization loop that iteratively updates the input image and minimizes the combined loss. Here we use TensorFlow’s GradientTape() to compute gradients and apply changes using the Adam’s optimizer:
@tf.function()
def compute_grads(cfg):
    with tf.GradientTape() as tape:
        loss = compute_loss(**cfg)[0]
    return tape.gradient(loss, cfg['init_image']), loss
Here’s a breakdown of the compute_grade() function:
- @tf.function: compiles the function below it into a TensorFlow graph for faster execution.
- compute_loss(): computes the gradient loss based on the input image
Now, we write the function to perform the artistic transfer. This function combines all the previous functions we’ve written, accepts the input and styled image, and transfers the artist’s style to the image based on a certain number of iterations:
def run_style_transfer(content_path, style_path, iterations=NUM_ITERATIONS):
    model, style_layers, content_layers = get_model()
    content_image = load_and_process_image(content_path)
    style_image = load_and_process_image(style_path)
    gram_style_features, content_features = get_feature_representations(
        model, content_image, style_image, style_layers, content_layers)
    init_image = tf.Variable(content_image, dtype=tf.float32)
    opt = tf.optimizers.Adam(learning_rate=5.0)
    best_loss, best_img = float('inf'), None
    cfg = {
        'model': model,
        'loss_weights': (STYLE_WEIGHT, CONTENT_WEIGHT),
        'init_image': init_image,
        'gram_style_features': gram_style_features,
        'content_features': content_features,
        'style_layers': style_layers,
        'content_layers': content_layers
    }
    print("Starting style transfer...")
    for i in range(iterations):
        grads, loss = compute_grads(cfg)
        opt.apply_gradients([(grads, init_image)])
        clipped = tf.clip_by_value(init_image, -127.5, 127.5)
        init_image.assign(clipped)
        if loss < best_loss:
            best_loss = loss
            best_img = init_image.numpy()
        print("Iteration {}, loss: {:.2e}".format(i + 1, loss.numpy().item()))
    final_img = deprocess_image(best_img)
    show_image(final_img)
    return final_img
Here’s what the function does:
- loads the VGG16 model and selects the relevant layer
- calls load_and_preprocess() to preprocess the content and style images
- captures the style and content details from the original images
- sets up the optimizer to adjust the image pixels
- repeatedly apply gradients to image to minimize loss
- tracks the best version of the image based on loss
- calls deprocess() to deprocess the image and display the final stylized image
Now let’s take a look at our stylized image output. Let’s run the next function to transfer the style of the Scream painting to our owl image:
stylized = run_style_transfer(CONTENT_IMAGE_PATH, STYLE_IMAGE_PATH)
Output image:
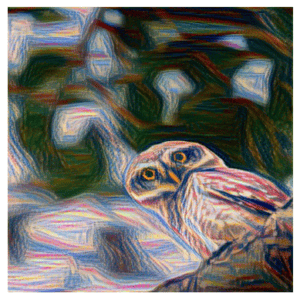
The above code performs neural style transfer by optimizing the input image to one image’s content with the style of another. At each step, the image is refined to match the desired style and content. The final stylized image is displayed after all iterations.
8. Conclusion
This article demonstrates the walkthrough of building an art style transfer program using deep learning techniques and tools like TensorFlow and the VGG16 model. We defined each step by breaking them down into functions from loading and preprocessing, feature extraction, computing loss, and style optimization loop.
The next step is to experiment further by trying out different layers, like realistic or vintage, adjusting the weights and iterations, and improvising on the output. The post How to Generate New Art From Existing Images Using Deep Learning? first appeared on Baeldung on Computer Science.
Content mobilized by FeedBlitz RSS Services, the premium FeedBurner alternative. |