Homemade sourdough bagels? Absolutely! With just 10 minutes of prep, this easy, overnight recipe uses active sourdough starter for the ultimate soft & chewy NY-style bagel. Customize with zesty everything bagel spice, sesame seeds and more! Recipe adapted from my bestselling book: Artisan Sourdough Made Simple.
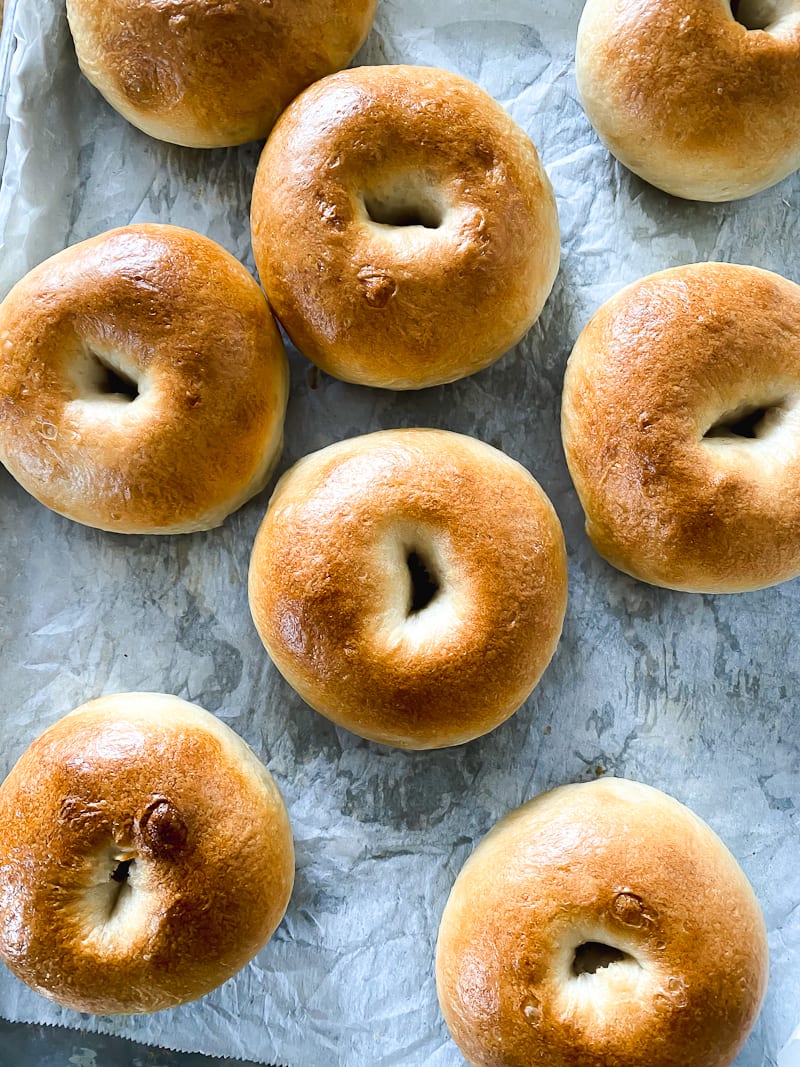
Here’s the scoop: sourdough bagels are nothing like yeasted bagels. They’re more flavorful. Less dense. Intensely chewy. You can eat two without getting a massive stomach ache. And the crust? It’s incredibly thin and crispy, and absolutely life changing! I highly recommend eating one warm, straight from the oven. If you’re into sourdough bread and want to expand your arsenal of sourdough bread recipes, this recipe is for you. It comes straight from my bestselling book, Artisan Sourdough Made Simple.
Now, before you get going, I do realize homemade sourdough bagels might seem challenging at first. But I promise, it’s not rocket science. This post breaks down the entire process step-by-step, from making the dough, to shaping, boiling and baking the bagels.
Sourdough Bagels Ingredients (You Will Need):
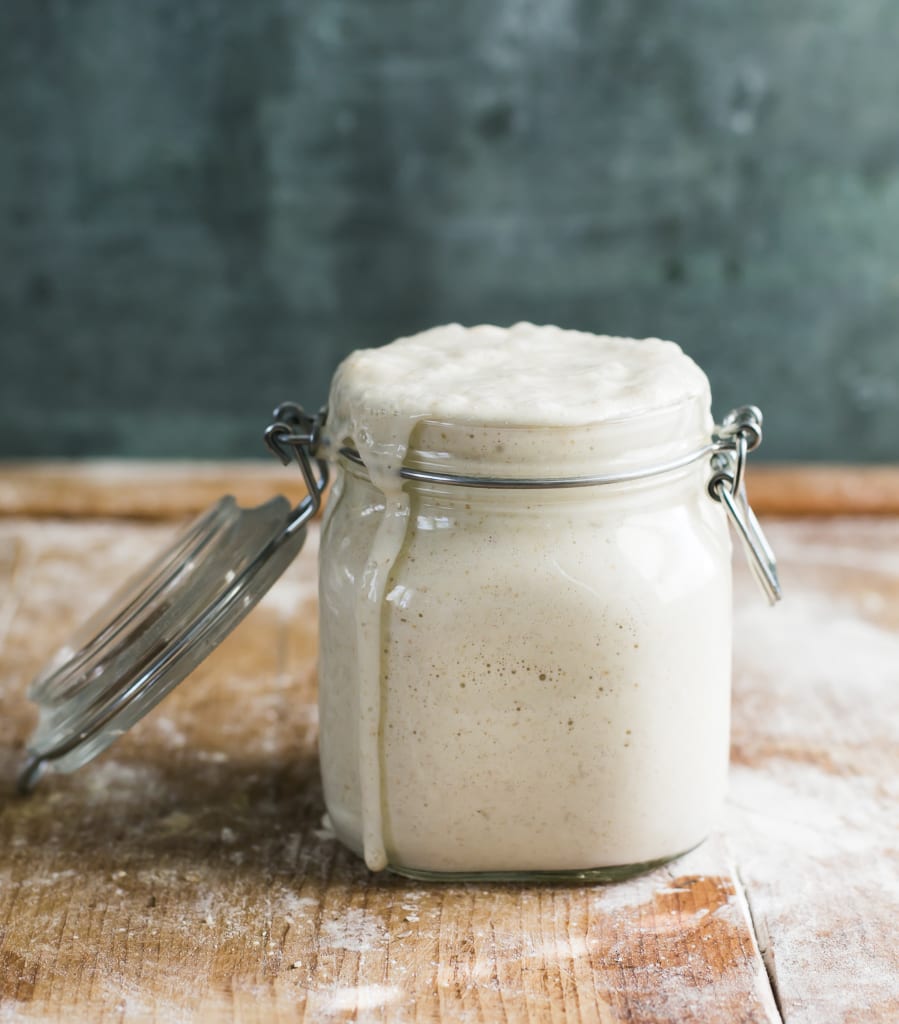
- Bubbly, active sourdough starter
- Good quality bread flour (I use King Arthur)
- Optional mixed toppings, such as Everything Bagel Spice, poppy, sesame, flax or sunflower seeds
How to Make Homemade Sourdough Bagels
First, you need a game plan. Understand this: Sourdough bagels include several steps, which can be broken down into manageable chunks. I recommend splitting the process over 2 days. Make the dough in the evening and let rise overnight in cooler temperatures; shape, boil and bake the bagels following day. See my Sample Baking Schedule for additional options.
Step #1: Mix the Dough
- Whisk the water, sourdough starter and sugar together in a large bowl. Add the flour and salt. Combine to form a rough dough; it will be very dry and stiff. Tip: you really need a large bowl or high sided dough tub. This dough is very strong and rises quite high especially when using King Arthur Flour.
- Cover and let rest at room temperature for 1 hr to relax the gluten. Return to the bowl, and work the dough into a semi-smooth ball. You’re are now done with the dough.
TIP: Why is the dough so dry? Bagels require a low hydration dough. The dry, stiff texture is easy to shape and produces a tight-knit interior crumb. This is what you want for bagels. Do not be tempted to add more water!
Step #2: Bulk Rise
Cover the dough, and let rise overnight at room temperature until double in size. This should take about 10-12 hrs @ 68 F; 8-10 @ 70 F.
Step #3: How to Shape Sourdough Bagels
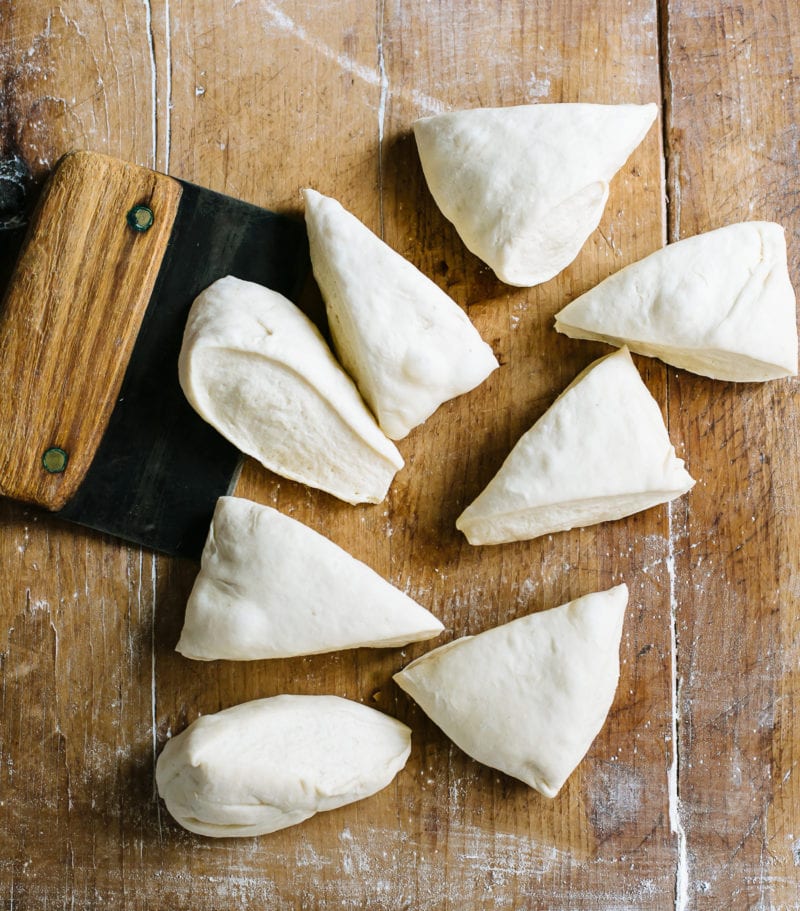
- Divide dough into 8 equal pieces, about 115 g each. Use a digital kitchen scale for accuracy.
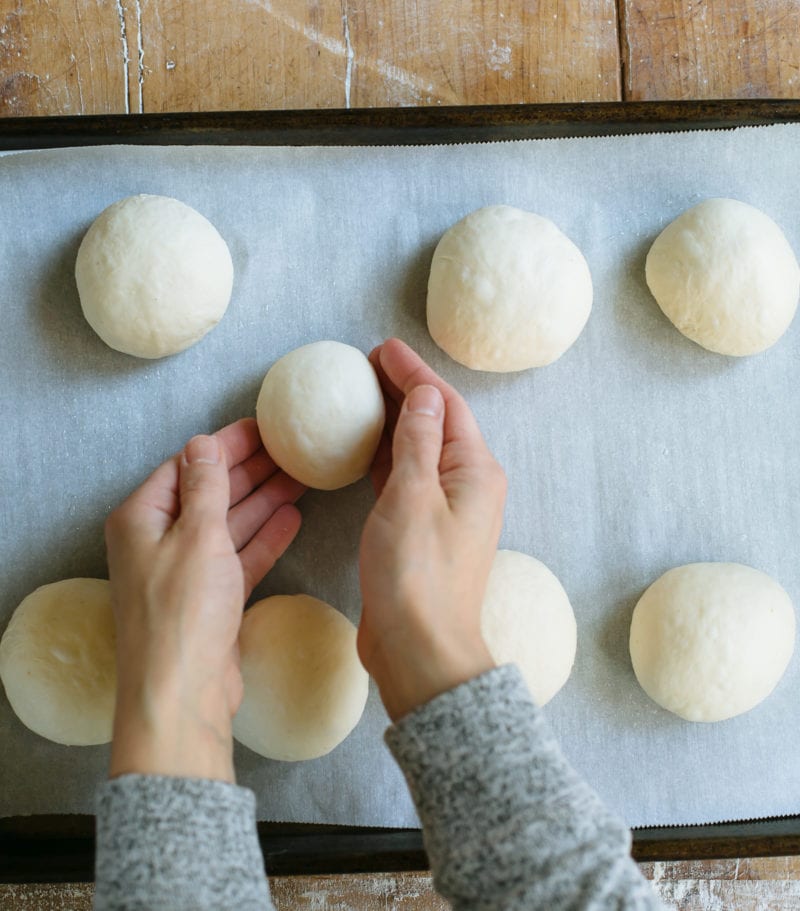
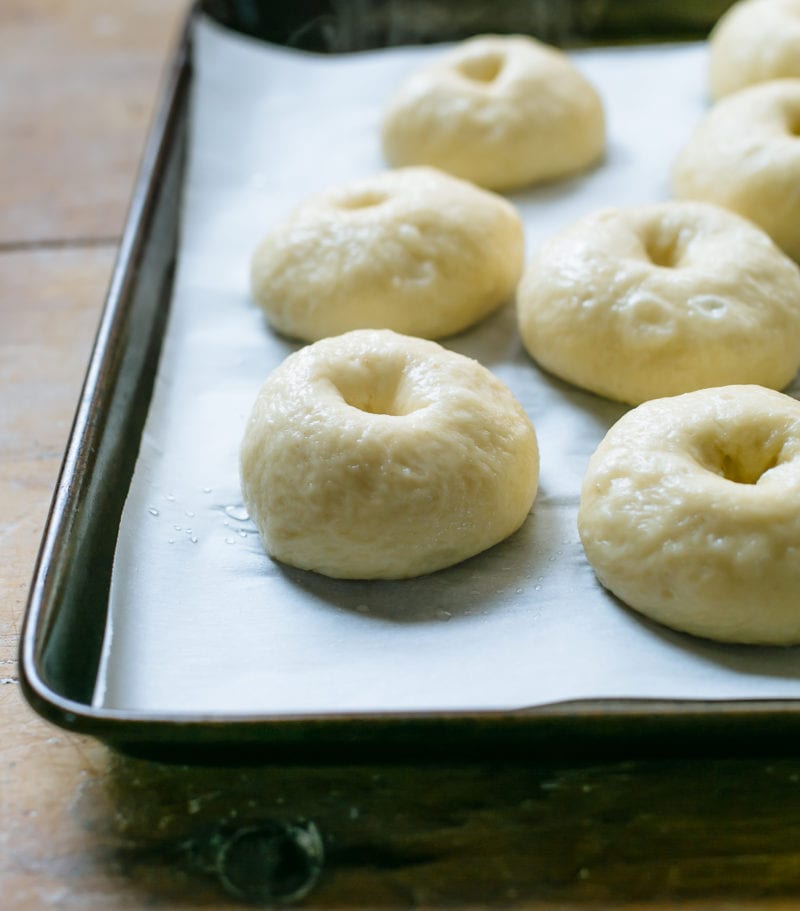
- Roll each piece into a ball. Place onto a parchment-lined sheet pan. Rest for 10-15 minutes.
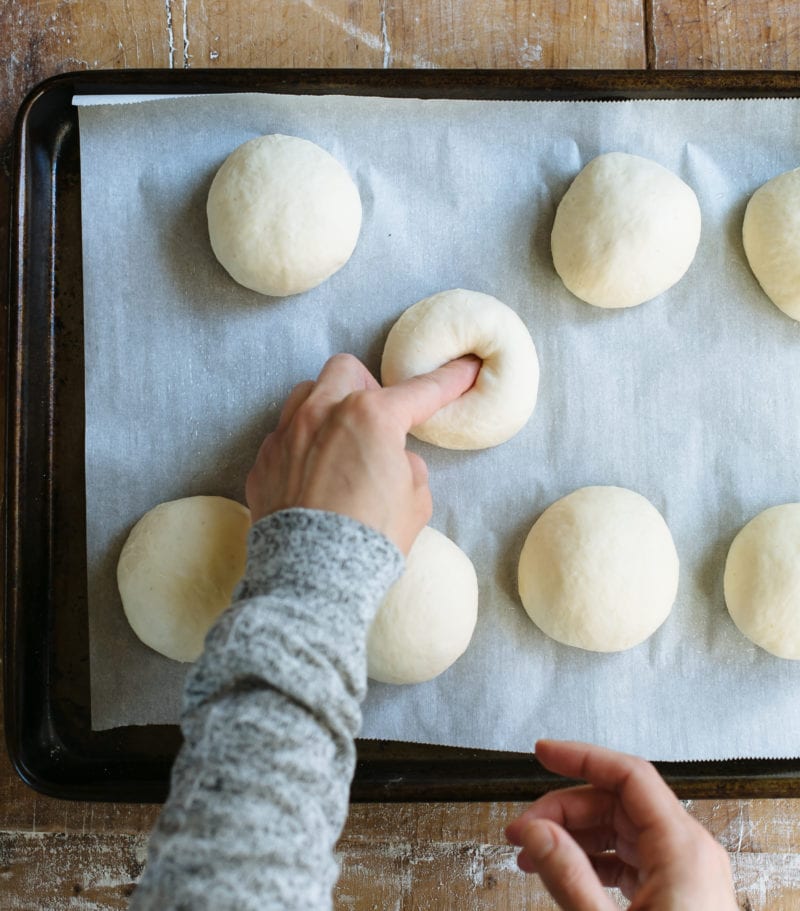
- Poke a hole into the center of each dough. Gently stretch the opening, using your fingers to roll it around.
Step #4: Second Rise
- Now the dough needs to rise again, but only for a short period of time. Cover and let rest at room temperature for 20 minutes; the dough will puff up slightly.
- Meanwhile, boil a pot of water. Add the honey (this adds color and flavor to the crust) and whisk well.
- Preheat your oven to 425 F. Set up a topping station: add seeds to a rimmed tray or shallow bowl.
Step #5: Boil The Bagels
- Gently lower 2-3 bagels into the pot and let float to the surface. Simmer for 30 seconds on each side for a thin crust.
- With a large slotted spoon, transfer the bagels onto the sheet pan, rounded side up. They will look weird and bumpy (totally normal) and feel slightly wet.
TIP: Why boil bagels in the first place? It helps to set the crust before baking. Otherwise the dough would puff up and rise too high. You can’t skip the boiling step- it’s part of what differentiates bagels from bread.
Step #7: Top Bagels with Seeds
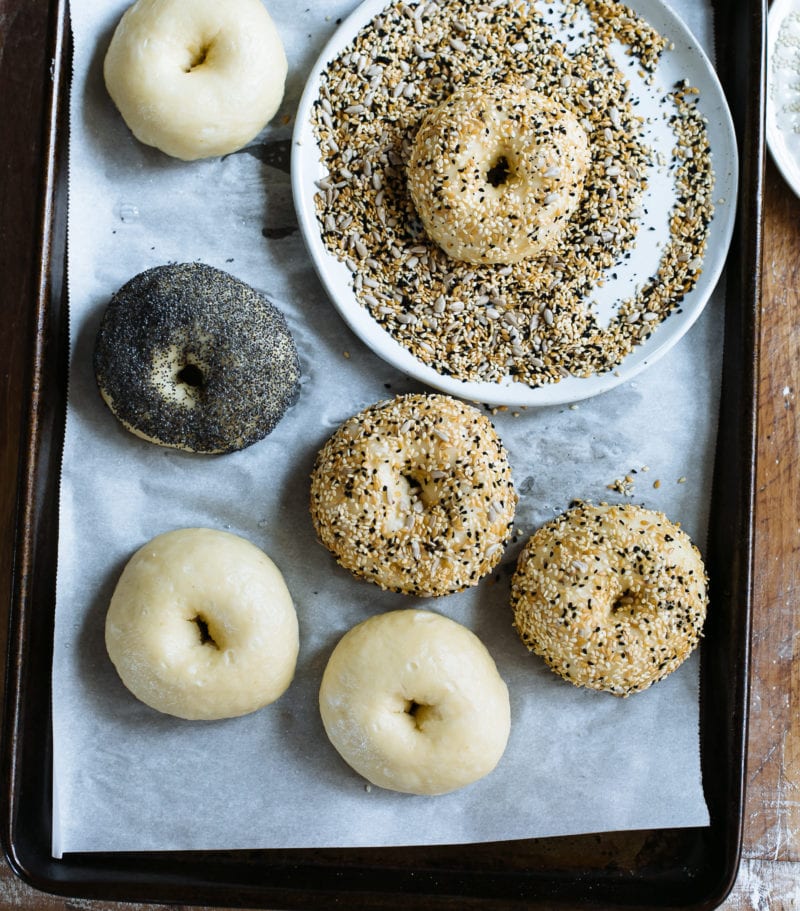
- When the bagels are slightly cool but still wet, dip the rounded side into the toppings. Leave a few plain (the crust is amazing).
- Place back onto the sheet pan.
Step #8: Bake the Bagels
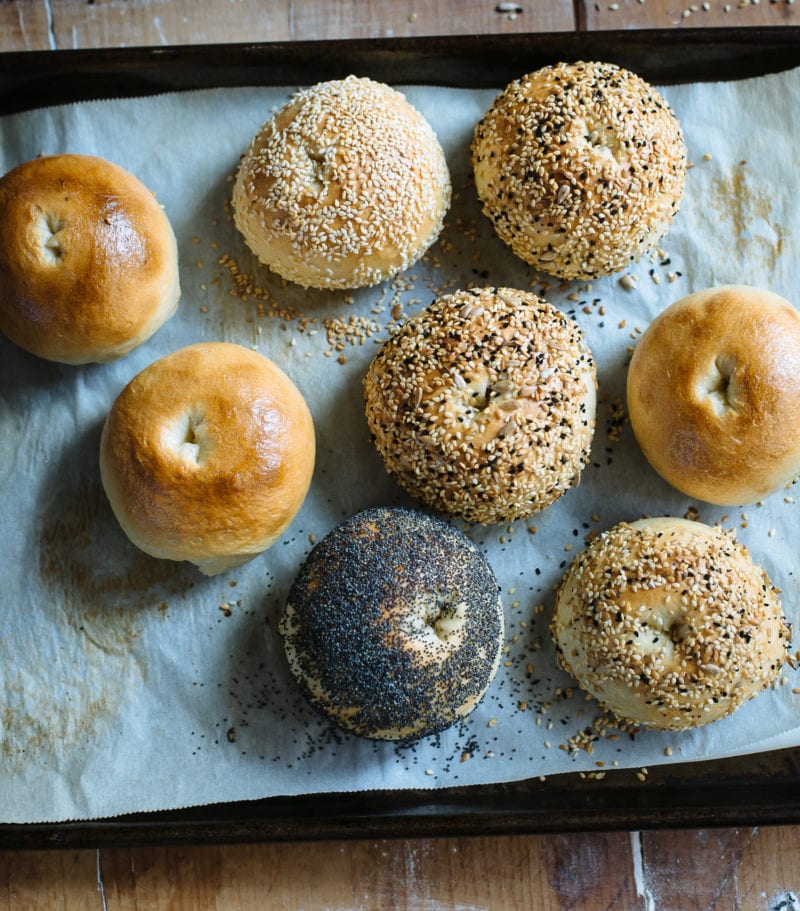
- Pop the sheet pan into the oven and bake for 20-25 minutes @ 425 F.
- Transfer to a wire rack to cool slightly (but please, do yourself a favor and enjoy one warm, straight from the oven!)
- To serve, top with salted butter, veggie cream cheese, smoked salmon etc. Or just eat plain. The choice is yours!
How to Store Bagels
I’ll be honest with you, your first batch of homemade bagels will be gone in a day. They’re just SO good.
But, if you do have any leftover, store in a plastic bag at room temperature for up to 2 days (although they are best enjoyed fresh before they get rubbery).
Bagels also freeze well; freeze them whole or sliced, covered in plastic wrap and a layer of foil, for up to 3 months. Warm in a low oven or toaster before serving.
Sample Baking Schedule
- Saturday Evening (8 PM): Make dough & let rise overnight @ 68 F. Note: in the summer, the dough will rise faster. Skip the overnight rise and make the dough during the day. Once almost doubled in size, cover and chill the whole bowl overnight. Proceed using the cold dough the following day.
- Sunday Morning (whenever you get up): Shape, boil, top & bake bagels.
More Sourdough Bread Recipes To Try!
- Sourdough Bread: A Beginner’s Guide
- Beginner’s Guide to Sourdough Focaccia
- Sourdough Pizza Crust {No steel or Stone!}
- Best Sourdough Pancakes
- Easy Sourdough Sandwich Bread

Best Sourdough Bagels (Soft, Chewy, Easy!)
- Prep Time: 15 hours
- Cook Time: 20-25 minutes
- Yield: 8 bagels
- Category: Sourdough Bread
- Method: Oven-Baked
- Cuisine: American
- Diet: Vegetarian
Description
With just 10 minutes of prep, this easy, overnight recipe uses active sourdough starter for the ultimate soft & chewy NY-style bagel. Customize with zesty everything bagel spice, sesame seeds and more! Recipe adapted from my bestselling book: Artisan Sourdough Made Simple.
Ingredients
For the Dough
- 150 g (3⁄4 cup) bubbly, active sourdough starter
- 250 g (1 cup plus 2 tsp) warm water (See Notes below for temperature range)
- 24 g (2 tbsp) granulated sugar
- 500 g (4 cups plus 2 tbsp) King Arthur bread flour
- 9 g (1 1⁄2 tsp) fine sea salt
- Cooking spray or oil, (for coating the plastic wrap)
For the water bath
- 20 g (1 tbsp) honey
Toppings
- Mixed seeds, such as poppy, sesame, fennel, flax and sun flower seeds or Everything Bagel Spice.
Notes
- Water temperature: In winter, I use 85-95 F water (29-35 C) to give the rise a boost. In summer, I use cooler water, about 55- 60 F (13-16 C) to slow down and control the rise.
Instructions
- Make the Dough: In a large bowl, whisk the starter, water, and sugar together with a fork. Add the flour and salt. Combine to form a rough dough, then finish mixing by hand until no lumps of our remain. The dough will be very stiff and dry. Note: it’s important to use a large mixing bowl- this dough is strong and rises quite high. As a mixing alternative, use a stand mixer fitted with the dough hook; run on low speed for 5 to 6 minutes to combine and knead.
- Cover the dough with a very damp towel and let rest for 45 minutes to 1 hour. After the dough has rested, work the mass into a semi-smooth ball, about 15 to 20 seconds.
- Bulk Rise: Cover the bowl with plastic wrap that has been lightly coated in oil to prevent sticking. Let rise until double in size, about 10-12 hrs when the temperature is 68 F (20 C); 8 to 10 hours @ 70°F (21°C). Note: in the summer, rise the dough during the day. Once the dough is almost double in size, cover and chill the whole bowl overnight (it will continue to rise slightly in the fridge). Proceed using the cold dough the following day.
- Shape: Line a sheet pan with a nonstick silicone mat or parchment paper. If using parchment, lightly coat with cooking spray or oil to prevent sticking.
- Remove the dough onto a non- floured work surface. Flatten the dough into a rectangle and divide into 8 equal pieces, about 115 g (4 oz) each. Gather the ends, flip the dough over, and roll each piece into a ball. Let the dough rest on your lined sheet pan for 10 to 15 minutes to relax the gluten.
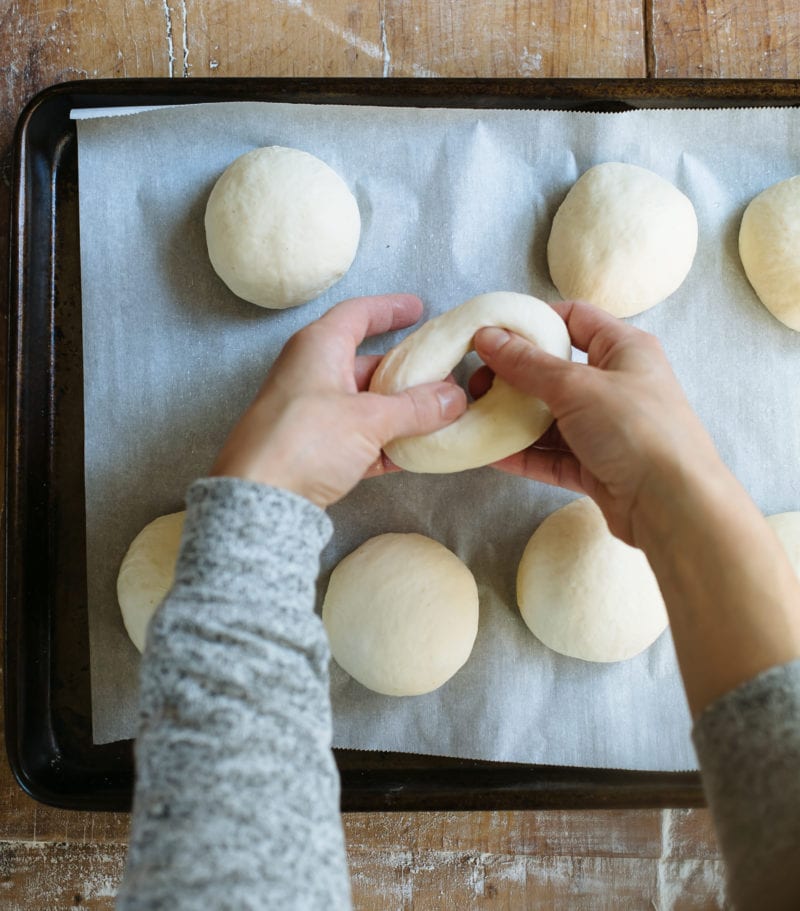
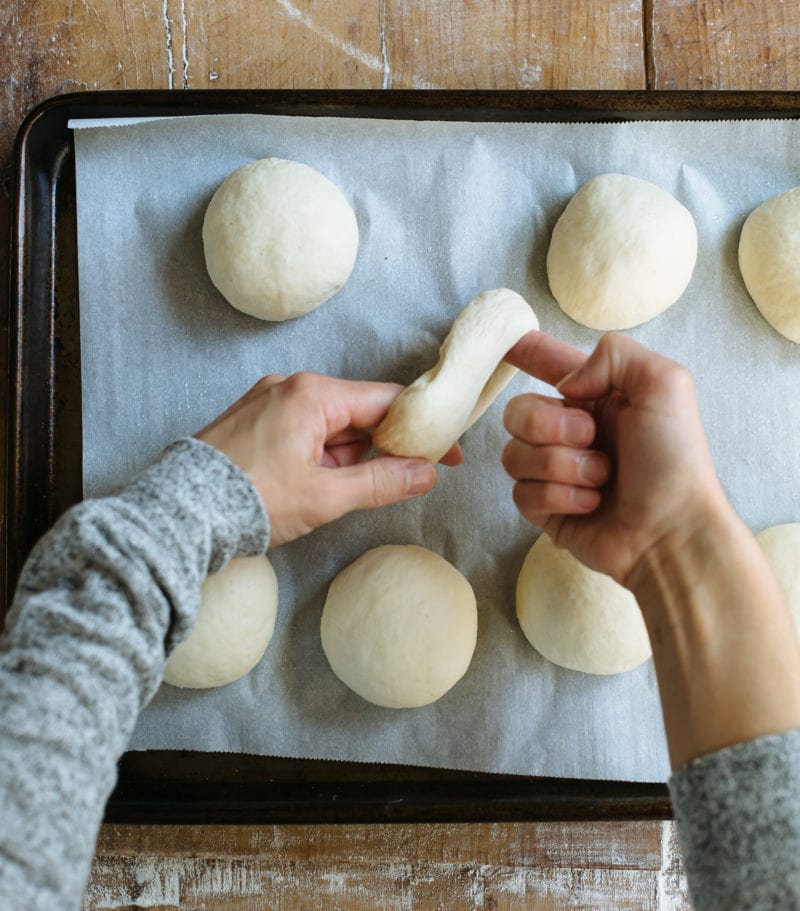
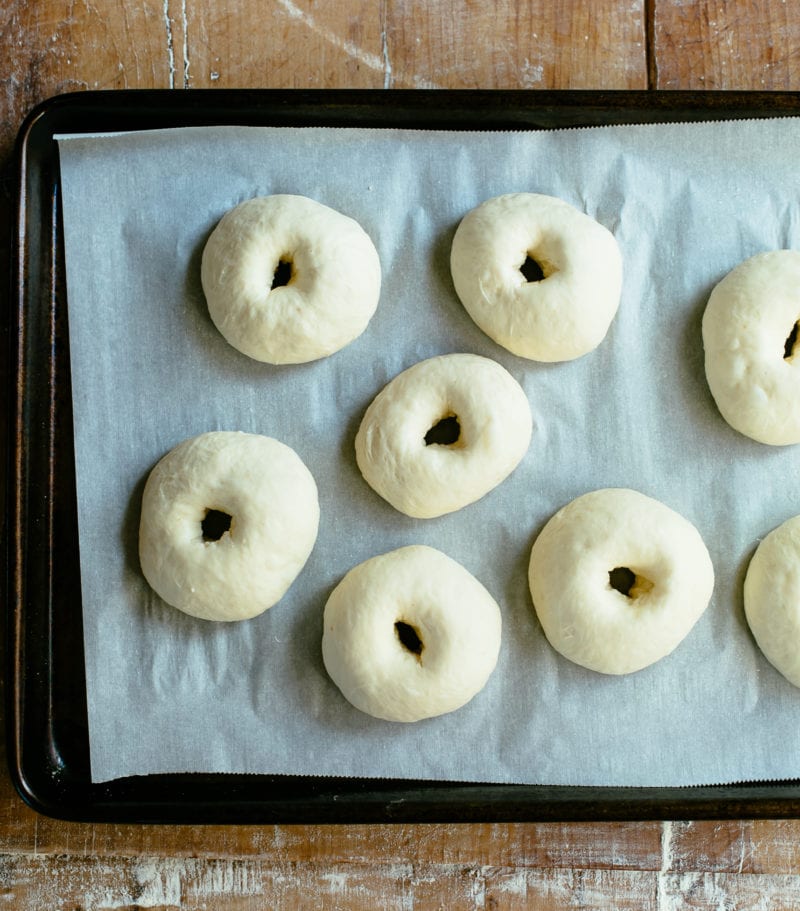
- Working with one ball of dough at a time, poke a hole straight through the center. Move your finger around in a circular motion to gently stretch the dough until the hole is about the size of a walnut. You can also lift up the dough, insert both index fingers through the center hole, and barrel roll to gently stretch the opening. When finished, place the dough back onto the sheet pan. It’s okay if the hole shrinks slightly. Repeat shaping the remaining dough.
- Second Rise: Cover the dough with a damp towel and let rest at room temperature for 15 to 20 minutes. The dough will puff up only slightly at this stage.
- Meanwhile, bring a medium pot of water to a boil. Add the honey and whisk well to dissolve. Preheat your oven to 425°F (220°C). Add the seeds to a rimmed tray or shallow bowl.
- Boil the bagels: Add 2 to 3 bagels into the pot and simmer for 30 seconds on each side for a thin crust. Note: if using cold dough from the fridge, the bagels might not float to the surface right away. Give them a nudge after 30 seconds or so and be patient. Using a slotted spoon, transfer the bagels back the sheet pan you used earlier, placing them rounded side up.
- Once slightly cool but still wet, dip the rounded side of the bagels into the seeds to coat. Place back onto the sheet pan and finish boiling the rest of the bagels.
- Bake: Place your sheet pan on the center rack. Bake the bagels for about 20 to 25 minutes. Flip them over to briefly cook the bottom side, about 1 to 2 minutes or less. When ready, your bagels will be puffed up, light golden brown, and feel light to the touch. Transfer to a wire rack to cool, but indulge yourself and eat one (or two) warm.
The chewy texture of bagels is best enjoyed when made fresh. Store in a plastic bag at room temperature for up to 2 days. Bagels also freeze well; freeze them whole or sliced, covered in plastic wrap and a layer of foil, for up to 3 months.


Comments
Beth says
This recipe is fantastic! I followed it to a tee and my bagels turned out great. I will not try another recipe. This was my first time making bagels and I couldn’t be happier with them. Chewy on the outside and a little crisp on the outside. Exactly as promised.
Beverly Wheeler says
Best recipe for bagels. Soft and chewy on the instead, nice little crunch on the outside, not too hard. Great taste! You get that nice sour taste. Thanks for a great recipe. My husband grew up in the Bronx. He gives these 2 thumbs up!
Briaja says
You will need to feed the start before you use it to make this recipe. It needs to be active and bubbly. You will have to make enough that you can comfortably take 3/4 cups out. So the 1/4 cup of all three method works for you to get 3/4 cups of active start then that’s great. If the “mother” is active already(fed within the last 12 hours and bubbly not flat) then you could take the 3/4 cups straight from that. I hope that makes sense. Start is very forgiving in my opinion. I never take from the “mother” like you said. I just feed it whatever quantities I need and let it do it’s thing. So I store probably 1/4 cup start and then sometimes add 1 cup water and 1 cup flour to that. Or I save 1 cup start and only add 1/2 cup start and 1/2 cup flour and it is ready sooner. Or sometimes I do a 1, 2, 3. So 1/4 cup start, 1/2 cup water, and 3/4 cup flour. That sits overnight. Honestly there are Soo many ways and people all prefer different things. Hope this provided some insight and not some stress haha.
Julia says
First time making bagels and these tasted delicious! I got compliments from everyone that tried them. I can’t wait to make them again!
Kate says
My favorite bagel recipe! I sell about 80+ bagels a week using this recipe! I’ve had a few people ask for the nutritional facts of the bagels and wondering if you could provide that! Thank you.
CoB says
Help! I really want to make this recipe but am confused. When I make sour dough bread, I pour out 1/4c from the mother and mix that with 1/4c flour and 1/4c water and then I let that rise 2-4 hours before making sour dough bread dough with it. For this recipe, do I do the same but use 3/4c or do you just pour 3/4c straight from the mother without mixing it with flour and water initially?
Amy says
I’m making this recipe now, but the dough is not stiff at all. It’s very sticky. I don’t know if this is due to elevation. I measured out ingredients in grams on the spot. Do I just add more flour? Will this ruin the recipe? I’m going to give it a go with a bit more flour either way!
Ali says
How did they turn out? What did you do to remedy the situation?
Caroline says
When should inclusions be added? Hoping to make some sun dried tomato bagels!
Emilie Raffa says
So funny… I just bought sun dried tomatoes yesterday :) Add inclusions after the first 1 rest (before the bulk rise). The dough will be softer, making the ingredients much easier to incorporate.
Kate says
Wow! Just wow! These bagels are amazing! Perfect light chewy outside and soft inside. If you are on the fence on whether to make these, DO IT! Thank you for this recipe!
Stephanie says
This recipe is absolutely outstanding! The best bagel I have ever HAD!
KT says
If I wanted to make these cinnamon raisin, at what point would I incorporate that into the dough?
Emilie Raffa says
After the first 1 hour rest. Try soaking the raisins in a little vanilla extract before adding to the dough- so good.
Brooke says
Amazing! These bagels are so good, so easy! Made them twice this week.. thank you!
Outlaw Quilter says
These bagels are fantastic! I made them for my company and now I’m starting a business:)
Arianna Johnson says
Can you par bake these bagels for baking at a later time?
Yehleen Ebbay says
I made these for the first time last week and was immediately enamored! They came out perfect and the recipe was so easy to follow! I’m fairly new to baking with sourdough and I would say this recipe is full proof! I didn’t have granulated sugar so I used brown sugar instead and it came out as expected! Planning to make again but can I use maple syrup instead of granulated sugar?If so, what would the conversion be? Thank you!!
Jacqueline says
I made these and they were so fluffy and delicious! My husband said he will not eat a store bought bagel again! How should I try to incorporate blueberries into this recipe?
Ellen Charalambous says
OMG. I am born and raised in NY so I know good bagels and let me tell you. THESE are AMAZING probably some of the best bagels I’ve ever had in my life!!!! Will be making these all the time now
Karla Piacentini says
These turned out excellent. Both taste and texture wise, but I’m wondering why the holes completely disappeared when I baked them. I’m wondering if I didn’t boil them long enough?
Aly says
I have the same issue! It seems they rise too much during baking in the oven
Anna Schawang says
Can I place in fridge after first bulk rise? Won’t have time to shape and bake in the morning right away?
Maddie says
I did this— after my first bulk rise at room temp they sat in my fridge for 16 hours and they turned out PERFECT!
Lisa says
Maddie – after your cold proof, did you shape the next day and then let them rise again/come to room temp on the counter? Or did you BF and shape, then put in the fridge and boil straight from there? :)
Shaina says
This recipe is amazing! I don’t think I can ever buy store bought again! This was my first time using my sourdough starter and I’m so glad I did it on this recipe! It’s very beginner friendly and simple. My whole family devoured these!
Kimberly Marie Thon says
These turned out better than any other recipe I’ve used. This will be my go to from now on.
Jess says
So easy and turned out absolutely delicious! I have a young starter so I let it bulk for about 18 hours instead of 12 and it worked perfectly.
Vikki says
Ok I’ve left overnight and it’s barely risen lol. My sourdough loves have but not the bagel dough. I’m in the uk and my kitchens about 15c I’ve put it on top of the boiler now hoping that may help any ideas. Thank you
Carla says
Hi!
I’m in Portugal and the dough is taken a lot more time than I’m used. I think it is because it’s colder and the dough its stifer than my usual bread. Its taken me 24h bulk fermentation
Brian G says
I just made these and they are pretty amazing. I forgot the honey in the water but it still turned out.
G says
Are these bagels like a regular sourdough loaf where I have to wait to cut into them or they will be gummy? Or can I slice and eat when still hot or warm? Thank you.
taylor says
we eat them warm!
Crystal says
This is a great recipe! I’ve made it twice the last two days and it’s perfect. Light insides, chewy outsides.
Sigrid Millard says
I have made these twice in the last month and they are delicious. Great recipe. I thought bagels would be so difficult, but thanks to your easy recipe I will be making them regularly. A shame I can’t post a photo as they looked so pretty. :-)
Sarah says
I have made these with King Arthur flour and they were amazing! I know king Arthur is best but what would be the difference if i used Lily bread flour instead? I know it has a lower protein content so would i need to adjust starter amount? Water?
Emilie Raffa says
Typically, yes. If your bread flour is lower in protein, the dough won’t absorb as much water (compared to KAF), so the bagel dough will be stickier. This particular dough happens to be very forgiving, so I’d recommend making the recipe as is, with Lily bread flour, and observe the texture. If it’s too sticky to work with, add more flour 1 tbsp at a time to correct the consistency.
Sarah Dare says
Thanks!! It was totally fine. I noticed no difference at all while working with it, only that it needed baked a couple more minutes. Delicious as always! Thank you for your help!
Eva says
Can the dough sit in the fridge longer than overnight? Could I keep the dough in the fridge overnight and make the bagels in the evening the next day?
Melissa says
These bagels are hands down the best I’ve ever had. Can you please tell me how I would double this recipe?
Michele says
Great recipe! Turned out fabulously
Dee says
This bagel recipe is everything!
This was my first time making bagels since I’m new to sourdough baking. I made this recipe with chocolate chips for a weekend brunch treat & my family loved it! This recipe is a keeper & plan to make more next week :) Thank you for sharing this recipe!
Sasha says
Love this recipe
But because of work I need to do a cold fermentation to have it ready by Friday night.
Any one let is rise at room temp for couple hours then cold ferment for the rest ?
Or can i go straight to a cold fermentation?
Please and thanks
Chelsey says
I turned the heat up in my kitchen to 25c and let them rise for 2 hrs before going in the fridge and they turner out great
Kristen Strickland says
I do this! I cold ferment overnight and continue with the recipe again in the morning. I don’t let it sit at room temp.