Inside: why work with a sketch and how it will make your scrapbook pages better
Everyone of us hit a creative wall sometimes. We finally find the time and mood to create some scrapbook pages but we have no inspiration at all, no ideas! This is definitely a frustrating situation because we stare at a pile of papers and embellishments and we are stuck. This is where the sketch comes in! I can't tell you how many times sketches have saved me and turned a boring and unfruitful afternoon into a multiple scrapbook page extravaganza!
WHAT IS A SKETCH?
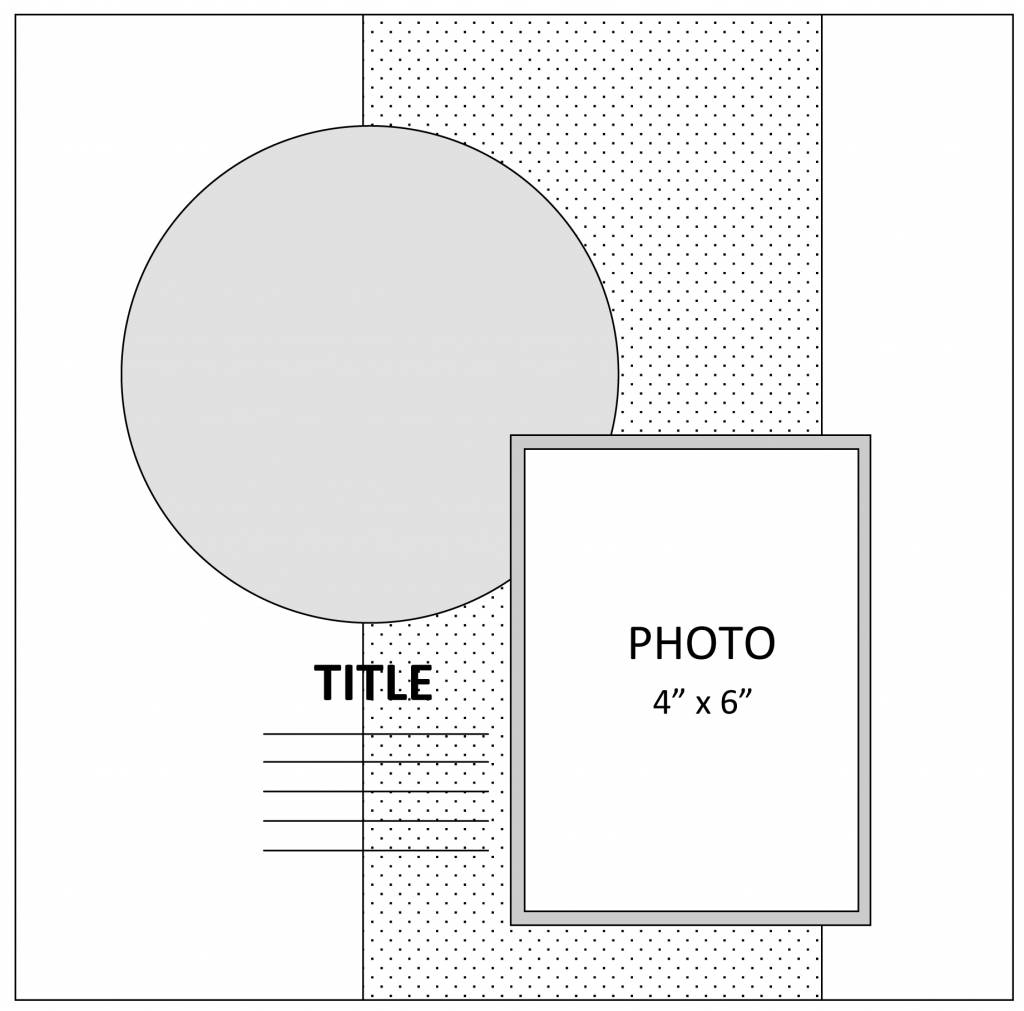
Think of sketches like “blueprints” for creating pages. They feature outlines for scrapbook layouts that give you a general idea of where to place your papers, photos, embellishments, titles and journal spaces, and typically come in gray scale tones to allow you to visualize the page designs with your own products. They differ in their level of details but all sketches have four main elements:
- PAPERS: different papers on the sketch are indicated by different shading or pattern. Shading is usually for solid colors and patterns are for pattern papers. However if there are no shading or patterns you need to figure out which papers you want to use.
- PHOTOS: the photo areas are specified by the word photo inside them and sometimes the size is also mentioned.
- EMBELLISHMENTS: most elements you will be able to tell. Flowers are typically shown as flowers. You may have a butterfly shown as a butterfly. most sketches show basic embellishments.
- TITLE AND JOURNALING: title and possibly a subtitle will be shown by simply stating those words. Journaling areas typically show as lines in the area where they plan for that.
DO I HAVE TO FOLLOW THE SKETCH EXACTLY?
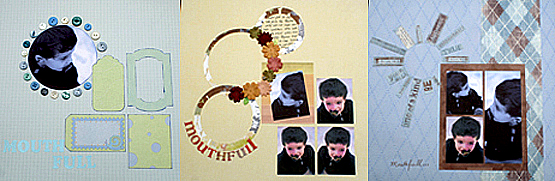
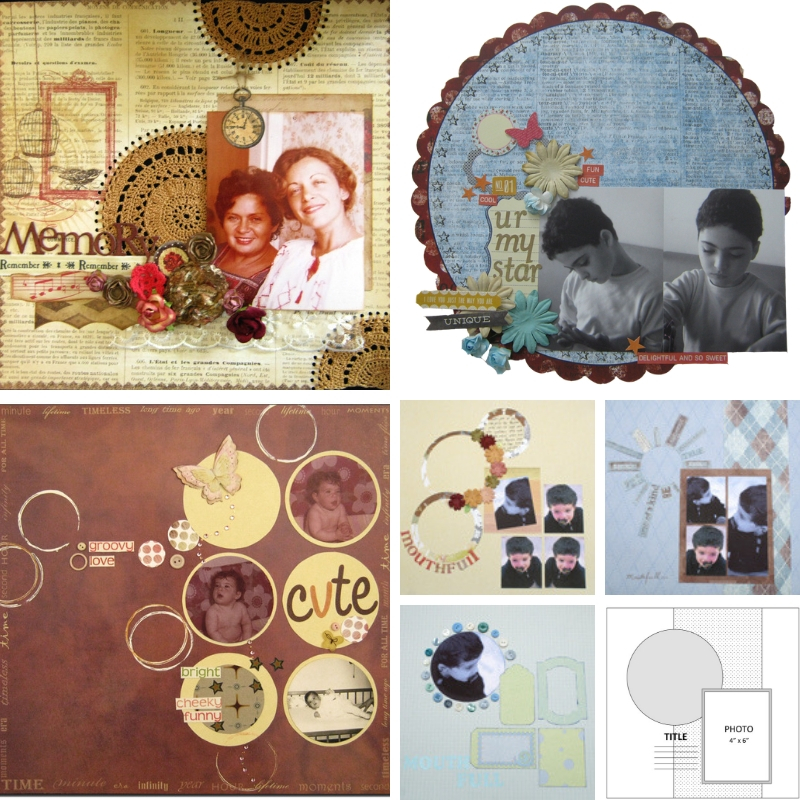
It’s up to you! You can pick and choose the elements that appeal to you, create a one-of-a-kind masterpiece loosely based on the sketch or completely scraplift the whole layout (this is perfectly acceptable, and in fact, highly encouraged). In the triple page photo below there are three different layouts all based on the sketch above.
HOW TO "READ" A SKETCH?
These three pages are an example of how you can "read" the sketch in three different ways. In the sketch there are a few main elements that can be implemented in a different way on the page: paper, photo, title and embellishments. The basic interpretation is one 4x6 photo on the right bottom corner with a circle paper on the left top corner. The title is below the circle with journaling below it. Let's analyze the three pages (from the left):
- The photo is in the circle shape and is placed where the circle paper should have been. There are four embellishments that form a loose rectangle shape where the photo should have been. the only thing that is in the same place as the original sketch is the title. Note that there is no journaling.
- The 4x6 photo is four smaller photos and the circle is three smaller circles. The title is below the circle but curved not straight.
- The photo is a cluster of three photos framed in one frame and the circle is made of words that are arranged in a circle. The words are basically the journaling too. The title is in the original place and this is the only page with the extra paper piece under the photo and circle.
SKETCH INTERPRETATION AND VARIATION
The idea of a sketch is to give you ideas and guidelines you can interpret it any way you like and create variation to any and/or all elements on the sketch. Here are some options how to change the sketch:
OMITTING AN ELEMENT
You can omit any element you want, except the photo if you're creating a scrapbook page. Layouts don't need to have journaling, embellishments or even a title. On U R My Star layout there is no 12x12 background paper and the circle embellishment is now the page itself.
ADDITION OF ELEMENT
If you like an element of the sketch you can add more of it. On the Memory page I added more crochet circles in addition to the one circle on the left. I added even more circles on the Cute page and omitted the rectangle photos all together.
TITLE AND JOURNALING
You can be very creative here. In the Mouthful and the page next to it both the journaling and the title are different than the sketch. The Mouthful title is curved and the journaling on that page is inside the top circle and not below the circle like in the original sketch. On the other page the journaling is cut out words arranged in a circle shape. The words are all adjectives describing the boy in the photo and are cut from a pattern paper.
PHOTO CHANGES
- NUMBER OF PHOTOS: when a sketch shows one photo it doesn't mean you have to use one photo. You can add more photos and keep them in the same general shape of a rectangle or square like a photo. It can be loosely arranged or framed together.
- ORDER OF PHOTOS: photos can also be arranged in other setting like a row or a column. On the two bottom layouts there are four photos on each page and they are arranged in a row. The circle of the sketch is reduced to a half circle.
- SIZE OF PHOTO: if you use more photos on the same 4x6 size then you'll have to change the size of the photos and make them smaller.
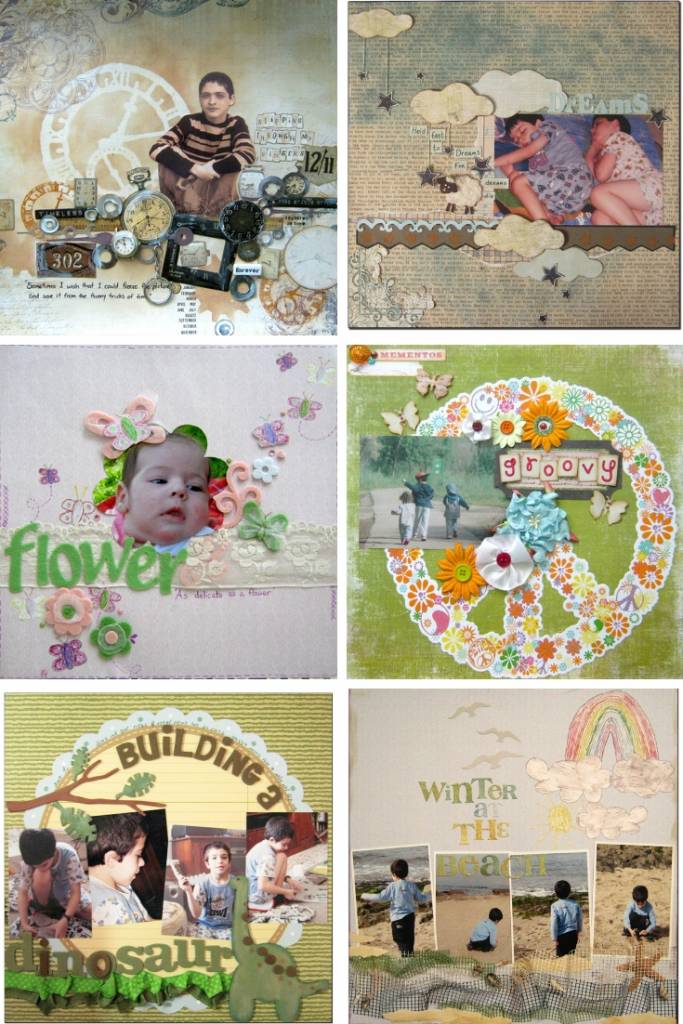
- SHAPE OF PHOTOS: play with the shape of the photo. It doesn't have to be rectangle, square or circle... it can be in a shape of a flower or in the shape of the image or person. On the top left page the photo is a cut image and not a rectangle and on the page below it the photo is in a shape of a flower. Here the rectangle and circle elements were completely omitted from the page.
CHANGING SHAPES
Other than the photos you can change the shape of other elements of the sketch. For example on the right top page the shape of the circle is changed into a cloud. On bottom right page the circle is changed into an arch (rainbow). Changing the shape can also mean changing its size. On the middle right layout the circle is much bigger and covers the entire page.
DIRECTION
The direction of the sketch can be changed in its entirety, meaning it can be flipped horizontally or vertically or turned in a 45 degree to the right or left. On the bottom two photos you see an interactive page that follows the same sketch. There are three photos instead of one, two on the left side and one on the circle itself which is a moving mechanism. The entire direction of the sketch was changed as well as it was flipped horizontally.
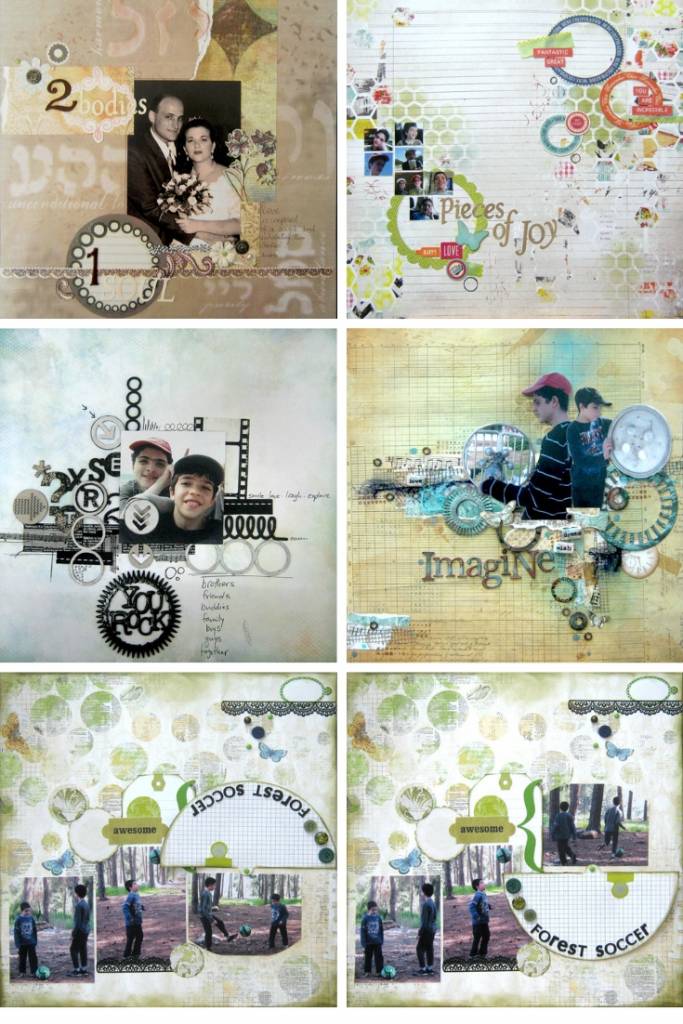
On the top left page and the one below it the sketch was flipped vertically and on both pages the photo is on top while the circle is on the bottom. On the top right layout the sketch was flipped both vertically and horizontally. Also there are other changes like size and number of photos and number of circles.
So you can see how many different interpretations and variations one sketch can have!
WHY USE A SKETCH?
If you're not convinced until now let me sum up the reasons why sketches are so great:
- The simplicity of sketches allows you to get creative with your scrapbook pages without having to come up with your own layout or design ideas.
- There are many interpretations and variations to each sketch which means you can create multiple pages using only one design.
- They are great for beginners who need help arranging the different elements on the page.
- Sketches come in a variety of designs, details and levels so they match any style, material or level of scrapbooking.
- You can find lots of free sketches online so you'll never be stuck without inspiration.
WHERE TO FIND SKETCHES?
Check out the 45 Scrapbook Page Ideas eBook for inspiring, unique and amazing scrapbook sketches and step by step tutorials.
You can also do a search for scrapbooking sketches and find many websites and blogs that offer them like PageMaps.
Leave me a comment telling me if you ever used a sketch to create a scrapbook page.
SAVE it for later - PIN IT!

Have fun creating!