I have new designs in the store! There are a couple of stud earrings - easy to finish and wear. Another is the multi-hole wood frames in 5 shapes which were especially created to give an even more organic look to the ever popular tree of life design. These frames will enable you to come up with your own unique wiring styles. Note : the dimensions are in the listing description. Click on "Learn More About This Item".
These wood frames will also give beginner wire wrappers a more secure way of working with wire and beads as the frame is rigid. Wire frame distortion is a common problem which I observed when teaching a basic tree of life wire class at a local bead store, Iguana Beads.
Iguana Beads, in Cambridge, Ontario, is also starting to stock my laser cut wood pieces which will be convenient for those who are local.
UPDATE : I missed the rectangle! I have since updated the Etsy listing. Laser cut wood orders completed on Monday June 17 and up to Noon EST Wednesday June 19 will receive a free rectangle.
Holes are located around the top of the frame as well as 3 at the bottom to help secure the tree. You do not have to use all the holes.
These frames are suitable as pendants as wiring smaller frames, while not impossible, will be challenging. I recommend using seed beads or other small beads. This is a great project for leftover beads.
The following is how I wired a round multi-hole frame. An alternative wiring approach can be seen in my How to Make a Wire Kazuri Tree of Life tutorial based on a solid ceramic disc with holes. Wood frames are a lot lighter! By all means, develop your own wiring style!
I first stained the wood frames. See this post on how to paint, stain and seal laser cut wood. You can use either 26 or 28 G wire.
I cut a length of wire about 6x - 8x the diameter of the pendant. How long will depend on whether you want to add a lot of beads or none at all. I pushed one end through a hole and picked up some beads and returned to the front via the next hole.
I also used the other wire end to pick up more beads to wrap around the frame.
Once I had enough beads ( you can make the leafy part of the tree larger than I did with my bonsai inspired tree). I twisted the two wire ends together.
I kept going with another length of wire and progressed across the top of the frame.
Once all the wiring is done, I twisted all the wires together to form the tree trunk. I also divided the wire ends into 5 groups.
Three of the wire groups went through the bottom three holes. The other outer groups were wrapped around the frame.
I finished up by wrapping the wire ends back up the tree "roots".
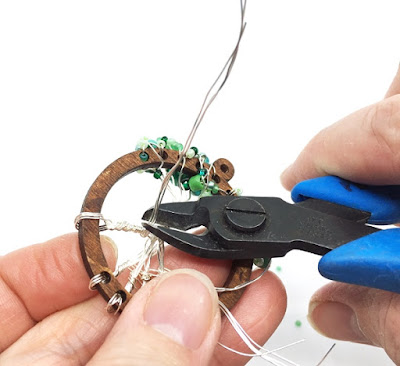
Trim off the excess wire so that the ends will end up in an inconspicuous spot.
Tuck in the wire ends - this is tricky to do so check to make sure they are not poking out.
Attach pretty bails and you are done! I uses gorgeous ones, courtesy of Tierracast - the silver and the copper. You also can get these US made high quality pewter bails from bead suppliers like Beadaholique
Photography
I used my iPhone 8+ with the Camera+ 2 app. I used the Orangemonkie studio which comes equipped with LED lights - for artificial light photography in my windowless basement studio. The Foldio2 is particularly affordable. I use the Foldio3 with the extra light bar because I need the room for tutorial photography.
My online class Easy Guide to Smartphone Jewelry Photography is now available. Read more about it here.
Before You Go:
Disclosure
This blog may contain affiliate links. I do receive a small fee for any products purchased through affiliate links. This goes towards the support of this blog and to provide resource information to readers. The opinions expressed are solely my own. They would be the same whether or not I receive any compensation.
______________________________
Original Post by THE BEADING GEM
Jewelry Making Tips - Wire JewelryTips -Jewelry Business Tips
EASY GUIDE TO SMARTPHONE JEWELRY PHOTOGRAPHY- Read more hereBefore You Go:
- How to Make a Wire Kazuri Tree of Life Pendant
- How to Make a Tree of Life Pendant
- Wire Tree of Life Crystal Pendant Tutorial
Disclosure
This blog may contain affiliate links. I do receive a small fee for any products purchased through affiliate links. This goes towards the support of this blog and to provide resource information to readers. The opinions expressed are solely my own. They would be the same whether or not I receive any compensation.
______________________________
Original Post by THE BEADING GEM
Jewelry Making Tips - Wire JewelryTips -Jewelry Business Tips


These frames are so light weight and so much fun. The possibilities are endless!
ReplyDeleteGreat Tree of Life tutorial Pearl!
What a wonderful idea, never seen anything like this before! I'm sure these frames will be very popular!
ReplyDelete