


Skyscraper Museum - 10:30 AM Pick
Green-Wood Cemetery - 10:00 AM Pick
MoMA Design Store, Soho - 11:00 AM Pick
Blue Heron Nature Center at Blue Heron Park - 1:00 PM Pick
Crotona Park Nature Center - 1:00 PM Pick
Wyckoff House Museum - 12:00 PM Pick
Wyckoff House Museum - 12:00 PM Pick
Fort Greene Park Visitors Center - 11:00 AM Pick
Wyckoff House Museum - 12:00 PM Pick


Activity Guides
- Beaches & Lakes
- Best Of Lists
- Birthday Parties
- Boats
- Boredom Busters
- Camps
- Childcare
- Christmas/Hanukkah
- City Guides
- City Hacks
- Classes & Enrichment
- Community
- Crafts & Recipes
- Earth Kids
- Easter
- Fairs & Festivals
- Fall Activities
- Family Travel
- Farms & U-Pick
- Free Activities
- GoList
- Halloween
- Holidays
- Hotels & Resorts
- Indoor Activities
- Museums
- News & Openings
- Outdoors
- Parent Talk
- Parks & Playgrounds
- Play Gyms & Sports Centers
- Pools & Spray Parks
- Preschools & Schools
- Restaurants
- Shows
- Skiing & Winter Sports
- Special Needs
- Special Occasions
- Sports
- Spring Activities
- STEM
- Stores & Services
- Summer Activities
- Theme & Water Parks
- Trains, Dinos & Heroes
- TV, Film & Movies
- Virtual
- Visitors Guide
- Weekend Events
- Weekend Trips
- Winter Activities
- Zoos & Gardens
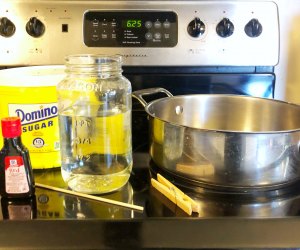
How to Make Rock Candy with Kids
Teach kids how to make rock candy for an edible rainy day activity. Making rock candy is also part science experiment, allowing kids hands-on learning with a few simple ingredients and kitchen tools.
Our easy rock candy recipe lets kids observe the crystallization process firsthand while making some pretty delicious treats. Sugar, water, and few more items found at home are all you need to turn your kitchen into a rock candy laboratory.
Read on for how to make rock candy with kids.
A few simple ingredients allow families to make rock candy at home.
Step 1 in How to Make Rock Candy
Gather your ingredients and tools. All you need is water, sugar, a clothespin, a pot for boiling, and a few wooden sticks to grow rock candy crystals in your kitchen! You might pick out a food color dye, too. We chose red. For the "sticks," we picked up a few bamboo skewers from the grocery store.

Create your sugar solution.
Step 2
Bring two cups of water to a boil in a large pot on the stove. Next, stir in four cups of sugar. Boil and continue stirring until sugar appears dissolved. This creates a supersaturated sugar solution. This is also the time to add in any flavor enhancements, such as vanilla or peppermint and so on. Allow the solution to cool for 15-20 minutes.

Prepare sticks for the candy.
Step 3
While waiting for the solution to cool, prepare your wooden sticks for growing the rock crystals. Wet the wooden sticks and roll them around in granulated sugar. Make sure you allow the sugared sticks to completely dry before continuing to Step 4. You'll need one stick per jar.

Add in a food color of your choice.
Step 4
Once the sugar solution is cool, add in food coloring to create rock candy of your preferred color. Leave this step out for clear-colored crystals.

Pour the cooled solution into a jar for the final candy-making process.
Step 5
Pour the cooled solution into a glass jar (or jars) and insert the sugar-covered wooden stick into the center of the glass. Make sure that the stick is not touching any part of the jar. If it does, the candy crystals could get stuck to the bottom or to the sides. You can divide the sugar solution across several smaller jars or use one large mason jar, depending on how many sticks of rock candy you'd like to make.
Once in place, secure the stick in place using a clothespin. Cover the top of the glass with a paper towel. You may have to poke a hole in the paper towel for the wooden stick to poke through.

Let the candy crystals grow in a quiet, dark place.
Step 6 in How to Make Rock Candy
Place the glass in a cool and quiet place. Loud noises and a lot of movement can disturb the crystal making process. Every day, the candy crystals will grow larger. They will reach their maximum growth potential by two weeks. When you have a good amount of rock candy crystals, remove the stick and place it on a sheet of wax paper to dry...before eating!
Our rock candy took at least two weeks to grow, and fyi, it turned out more pink than red!

Final rock candy creation! Yum.

