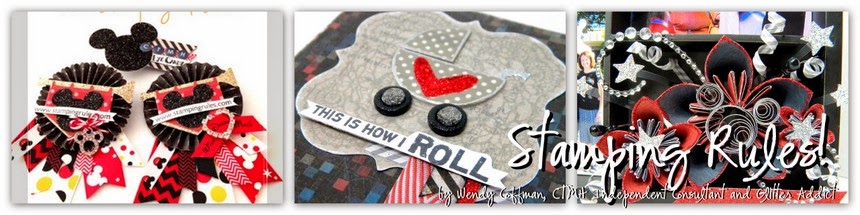
So I've been working on these watercolor rolled Cricut cut flowers for a very special project, and posting the pics to my Instagram. We have these flowers in different shapes on many of the CTMH cricut cartridges. This shape in particular is from the Art Philosophy cartridge, which remains my favorite cartridge to this day. It's my favorite flower on my go to, almost-always-has-what-I-need cartridge.

I had cut these flowers out of plain white cardstock, then colored them using a water brush to pick up ink from my ink pads. When the shapes were dry I rolled and shaped them into this:

There was one left over, which I used on this card, which lead to a question on Facebook about how to roll up these funky rolled flower shapes. Since rolling and shaping flowers is one of my favorite things, here's a little infographic tutorial for you!

Seven Steps to Beautiful Rolled Flowers:
- The first thing I do with a freshly cut rolled flower shape is add a dab of dry adhesive to the flat center of the shape. This could be Tombo, a glue dot, whatever you like that sticks well.
- Then I use my CTMH Quilling tool to roll them. I insert the smallest end into the wide slot on the tool. You could use tweezers, but I find this so much easier.
- Roll up the flower shape towards the center, wrapping it tightly around the tool.
- When you get it rolled as far as you can, Hold it tight for a few seconds to sort of "set" the curl.
- Let it go (Let it go!) and slide it off the tool. Place it on a flat surface and gently tap the center to help it relax into shape. Then press down lightly on that center to stick it to that adhesive we applied earlier. That's just to hold it in place until the next step.
- Apply Liquid Glass (or the sturdy liquid adhesive of your choice) down in between the petals of the flower. Let that dry completely before moving on to the last step.
- Use the quilling tool on the smaller side to roll the petals back. I like to start on the outsdie and work my way in. Sometimes I leave the center area untouched for a more rose like effect. In the photo on the chevron above I used the tool to push in and down the center petals for more of a peony center. If I need it flatter I'll smack it down with a handy 3 x 3 or bigger acrylic block. Sometimes I fill the centers with Glitter. Take that basic flower and make it your own!

If you want to color on, emboss, sand/distress your flower, do that before you start step one. The possibilities with these rolled flowers are endless...endlessly fun!

1 comment:
I hope to see these flowers at Convention!
Post a Comment