Very recently I decided to completely re-do my home lab hardware, and really step things up a few notches. My previous home lab gear was too old to use for anything useful, so out with old and in with the new! As a result of this new gear, I wanted to publish at least one blog post on the network configuration since it’s no longer just a simple flat network. The hardware will support both VMware and Nutanix hypervisors, including SDN solutions like NSX-T. This post will focus on the network, and configuring my MikroTik switch and router.
My single server for nested virtualization is:
Dell Precision 7920 Tower
Dual Intel Gold 5220R CPUs (2.2 GHz, 48 total pCores, 96 threads)
384GB DDR4-2666 ECC RAM
5TB NVMe local storage (2x 2TB, 1x 1TB) via MegaRAID 9460-16i
4 port 10Gbps Marvell 41000 SFP+ NIC (via HPE)
For my lab network gear, I have:
MikroTik CRS317-1G-16S+RM (16x 10 Gbps SFP+ ports) – Layer 2 switch
MikroTik CCR2004-1G-12S+2XS (12 10 Gbps SFP+ ports) – Router
As you can see, this is a pretty beefy lab with one decked out workstation for virtualization, and upstream 10Gb switching and routing. While the Dell Precision 7920 is not on the VMware HCL, the NIC and RAID card are. So I had no issues installing ESXi 7.0 U2, and didn’t have to manually install any driver VIBs.
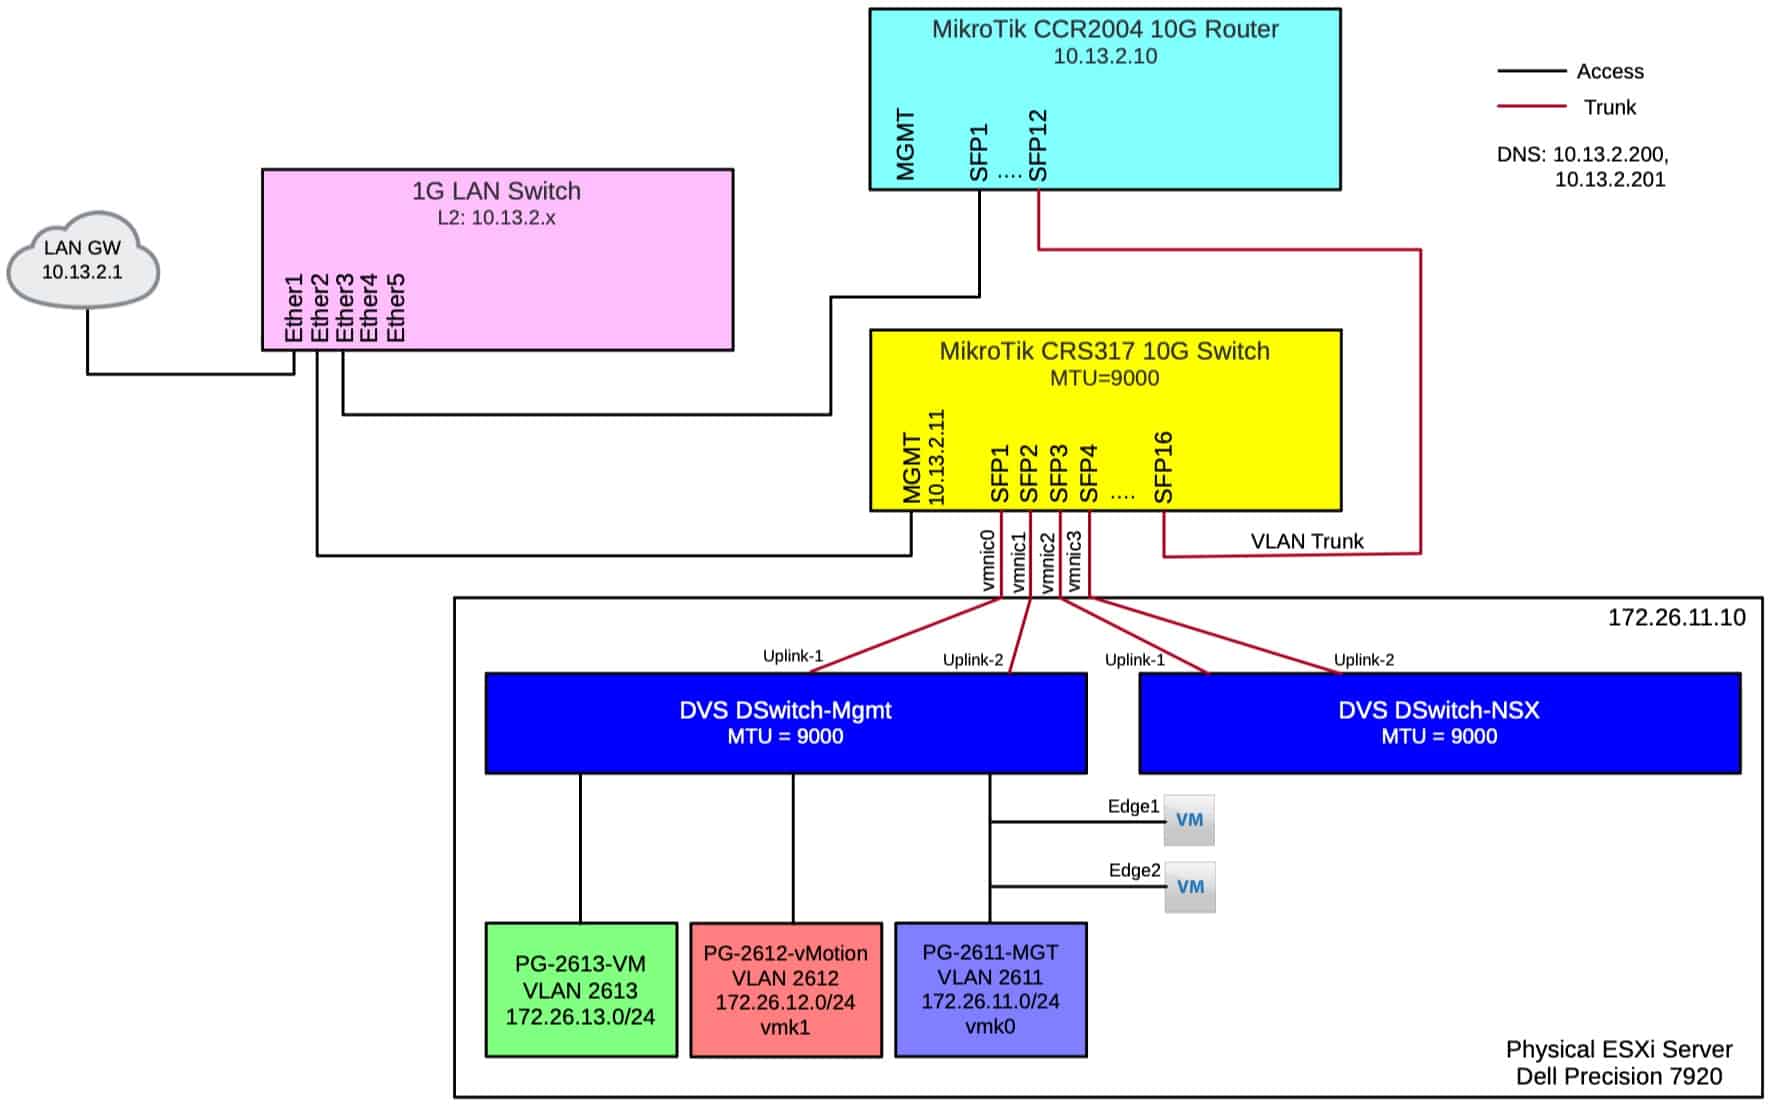
Because I’ll be building up and tearing down nested environments on a regular basis, I wanted all lab gear on their own networks, routed with my home LAN and internet. I set aside 172.16.0.0/12 for the lab networks. My home LAN is on the 10.13.2.0/24 network. The diagram below shows the physical topology of network. Note the NSX-T portion is still under construction, and more will come in the future on that.
As you can see, my workstation is configured with vSphere using three VLANs for traffic separation. I’m not using vSAN, or that would be on yet another port group and VLAN. Two physical NICs are dedicated to a management distributed switch (left), and two will be used for NSX-T (right). The MikroTik CRS317 will handle all the layer 2 switching needs, while the CCR2004 will handle all routing for the network and out to the rest of the LAN. The purple 1G LAN switch is just an unmanaged switch that’s in the room to support additional devices in the same room and serves as an uplink to the rest of the LAN.
MikroTik CRS317-1G-16S+RM Switch Config
When looking at what network gear to use, I really wanted to go 10Gb end-to-end, to help future proof the network for the foreseeable future. Enterprise class 10Gb switches and routers are extremely pricey, and not in my home budget. However, with some performance cautions, the MikroTik gear supports 10Gb traffic and is extremely affordable. Would I use MikroTik in a true enterprise environment? Nope! But it’s working well for a home lab with modest performance requirements.
First up, I wanted to configure the CRS317-1G-16S+RM, strictly for layer 2 operation. And I wanted the 1Gbps management port on my 10.13.2.x network for out of band management of the 172.16.0.0 address space. If you reset your CRS317 to the default state and remove the default configuration, you can simply copy/paste all of the commands below and completely configure the switch without touching the UI.
Note that both the router and switch are configured for jumbo frames, so that I can deploy any SDN I wish.
					# Setup OOB management interface
/interface ethernet set [ find default-name=ether1 ] name=MGMT
/ip address
add address=10.13.2.11/24 interface=MGMT network=10.13.2.0
# Global Settings
/ip route add dst-address=0.0.0.0/0 gateway=10.13.2.1
/ip dns
set servers=10.13.2.200,10.13.2.201
/system identity
set name=CRS317
/system ntp client
set enabled=yes primary-ntp=216.239.35.8 secondary-ntp=216.239.35.4
/user set 0 password="password"
# Set Jumbo frames
/interface ethernet
set sfp-sfpplus1,sfp-sfpplus2,sfp-sfpplus3,sfp-sfpplus4,sfp-sfpplus16 l2mtu=10218
set sfp-sfpplus1,sfp-sfpplus2,sfp-sfpplus3,sfp-sfpplus4,sfp-sfpplus16 mtu=9000
# Bridge Configuration
/interface bridge
add name=bridge vlan-filtering=no mtu=9000
/interface bridge port
add bridge=bridge interface=sfp-sfpplus1 hw=yes disabled=no
add bridge=bridge interface=sfp-sfpplus2 hw=yes disabled=no
add bridge=bridge interface=sfp-sfpplus3 hw=yes disabled=no
add bridge=bridge interface=sfp-sfpplus4 hw=yes disabled=no
add bridge=bridge interface=sfp-sfpplus16 hw=yes disabled=no
set bridge=bridge ingress-filtering=yes frame-types=admit-only-vlan-tagged [find interface=sfp-sfpplus1]
set bridge=bridge ingress-filtering=yes frame-types=admit-only-vlan-tagged [find interface=sfp-sfpplus2]
set bridge=bridge ingress-filtering=yes frame-types=admit-only-vlan-tagged [find interface=sfp-sfpplus3]
set bridge=bridge ingress-filtering=yes frame-types=admit-only-vlan-tagged [find interface=sfp-sfpplus4]
set bridge=bridge ingress-filtering=yes frame-types=admit-only-vlan-tagged [find interface=sfp-sfpplus16]
/interface bridge vlan
add bridge=bridge tagged=sfp-sfpplus1,sfp-sfpplus2,sfp-sfpplus3,sfp-sfpplus4,sfp-sfpplus16 vlan-ids=2611
add bridge=bridge tagged=sfp-sfpplus1,sfp-sfpplus2,sfp-sfpplus3,sfp-sfpplus4,sfp-sfpplus16 vlan-ids=2612
add bridge=bridge tagged=sfp-sfpplus1,sfp-sfpplus2,sfp-sfpplus3,sfp-sfpplus4,sfp-sfpplus16 vlan-ids=2613
/interface vlan
add name=2611-MGT interface=bridge vlan-id=2611 mtu=9000
add name=2612-vMotion interface=bridge vlan-id=2612 mtu=9000
add name=2613-VM interface=bridge vlan-id=2613 mtu=9000
/interface bridge set bridge vlan-filtering=yes ingress-filtering=yes frame-types=admit-only-vlan-tagged
MikroTik CCR2004-1G-12s+2XS Config
A bit more tricky to configure is the MikroTik CCR2004 router. Since this will be routing between various VLANs and the rest of my home network, the configuration is a bit more nuanced. However, it is still really easy to understand once you get it up and running. Unlike the CRS317, I’m NOT connecting the management port on the CCR2004, as the router has an uplink to the house LAN that I can use to configure the switch. The running configuration of my router is below. Again, if you reset the router to factory defaults and remove the default configuration, you can simply copy/paste the config below for the full configuration without touching the UI.
					# Global settings
/ip route add dst-address=0.0.0.0/0 gateway=10.13.2.1
/ip dns
set servers=10.13.2.200,10.13.2.201
/system identity
set name=CCR2004
/system ntp client
set enabled=yes primary-ntp=216.239.35.8 secondary-ntp=216.239.35.4
/user set 0 password="password"
# Set Jumbo frames
/interface ethernet
set sfp-sfpplus1,sfp-sfpplus2,sfp-sfpplus3,sfp-sfpplus4,sfp-sfpplus5,sfp-sfpplus6,sfp-sfpplus7,sfp-sfpplus8,sfp-sfpplus9,sfp-sfpplus10,sfp-sfpplus11,sfp-sfpplus12 l2mtu=9578
set sfp-sfpplus1,sfp-sfpplus2,sfp-sfpplus3,sfp-sfpplus4,sfp-sfpplus5,sfp-sfpplus6,sfp-sfpplus7,sfp-sfpplus8,sfp-sfpplus9,sfp-sfpplus10,sfp-sfpplus11,sfp-sfpplus12 mtu=9000
# Setup Bridge
/interface bridge
add name=bridge vlan-filtering=no mtu=9000
/interface bridge port
# upstream port will be untagged (access) port of VLAN ID 42
add bridge=bridge pvid=42 ingress-filtering=yes frame-types=admit-only-untagged-and-priority-tagged interface=sfp-sfpplus1
# The rest of SFP+ ports are bridged together, all tagged
add bridge=bridge ingress-filtering=yes frame-types=admit-only-vlan-tagged interface=sfp-sfpplus2 disabled=yes
add bridge=bridge ingress-filtering=yes frame-types=admit-only-vlan-tagged interface=sfp-sfpplus3 disabled=yes
add bridge=bridge ingress-filtering=yes frame-types=admit-only-vlan-tagged interface=sfp-sfpplus4 disabled=yes
add bridge=bridge ingress-filtering=yes frame-types=admit-only-vlan-tagged interface=sfp-sfpplus5 disabled=yes
add bridge=bridge ingress-filtering=yes frame-types=admit-only-vlan-tagged interface=sfp-sfpplus6 disabled=yes
add bridge=bridge ingress-filtering=yes frame-types=admit-only-vlan-tagged interface=sfp-sfpplus7 disabled=yes
add bridge=bridge ingress-filtering=yes frame-types=admit-only-vlan-tagged interface=sfp-sfpplus8 disabled=yes
add bridge=bridge ingress-filtering=yes frame-types=admit-only-vlan-tagged interface=sfp-sfpplus9 disabled=yes
add bridge=bridge ingress-filtering=yes frame-types=admit-only-vlan-tagged interface=sfp-sfpplus10 disabled=yes
add bridge=bridge ingress-filtering=yes frame-types=admit-only-vlan-tagged interface=sfp-sfpplus11 disabled=yes
add bridge=bridge ingress-filtering=yes frame-types=admit-only-vlan-tagged interface=sfp-sfpplus12
/interface bridge vlan
# sfp-sfpplus1 gets added as untagged automatically due to pvid setting above
add bridge=bridge tagged=bridge vlan-ids=42
add bridge=bridge tagged=bridge,sfp-sfpplus12 vlan-ids=2611
add bridge=bridge tagged=bridge,sfp-sfpplus12 vlan-ids=2612
add bridge=bridge tagged=bridge,sfp-sfpplus12 vlan-ids=2613
/interface vlan
add name=WAN interface=bridge vlan-id=42
add name=2611-MGT interface=bridge vlan-id=2611 mtu=9000
add name=2612-vMotion interface=bridge vlan-id=2612 mtu=9000
add name=2613-VM interface=bridge vlan-id=2613 mtu=9000
/ip address
add address=10.13.2.10/24 interface=WAN
add interface=2611-MGT address=172.26.11.1/24
add interface=2612-vMotion address=172.26.12.1/24
add interface=2613-VM address=172.26.13.1/24
/interface bridge set bridge vlan-filtering=yes
Summary
Setting up a new lab is always exciting, and a great learning experience. Getting the MikroTik configurations exactly right did take some time and research. But RouterOS is very flexible, and there are great support forums for questions. So far I’m happy with the gear I’ve purchased, and it should lead to a lot more blog content over the coming years. If you want to setup a similar configuration, you can easily take the running configs I have and modify them as needed to suite your needs.


