 During the monthly Q&A session of The Content Secret to Closing More Clients masterclass, I was asked if we have a blog checklist.
Something to make it really easy to be certain you’ve included everything you should before you hit publish.
Though it’s never been formalized, it was fairly easy to go through and build a checklist.
(Though it took a really long time to get it all on paper and ready for publication. Don’t let the simplicity of the blog checklist fool you!)
In the next four weeks, I am going to show you everything we do to prepare an article for publication. In the last installment, I’ll show you what we do to promote said content.
At the end, we’ll provide the full blog checklist so you can make duplicates and check the boxes every time you publish new content.
It has been bucketed this way:
- Writing for humans
- Writing for robots
- Optimizing the content
- Promotion
And, because writing for humans is the most important, we’ll start there today.
Blog Checklist: Writing for Humans
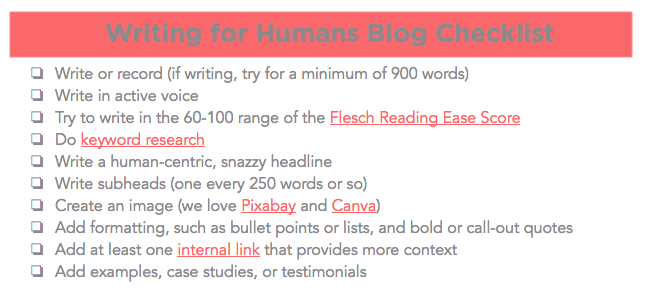
The first thing you want to do is sit down and write.
If you have a topic in mind, just write (or record, depending on your format).
We sometimes overthink the process and that’s where we get hung up.
It’s overwhelming to think about everything that comes after the writing part.
But I promise the hardest part is getting ideas out of your brain.
Once you do that, you can go back and do the rest.
So just sit down and write. Don’t worry about anything else until you have a draft you’re happy with.
If you need help thinking of ideas or planning your editorial calendar, see our content creation series.
That will help you plan and research your content.
But the first step in the blog checklist is to just write.
Write in Active Voice
We all tend to write in passive voice. It’s because we write like we speak.
I’m also guilty of it and usually get an alert from Yoast that says, “Eleven percent of your sentences are passive.”
I always go back and revise those sentences and you’d think I’d get it right from the start.
Nope.
Just write. Don’t worry about editing yourself as you go. That’ll come later.
You can revise sentences to be active after you get the words on digital paper.
If you need help with active versus passive, the Purdue Online Writing Lab can help.
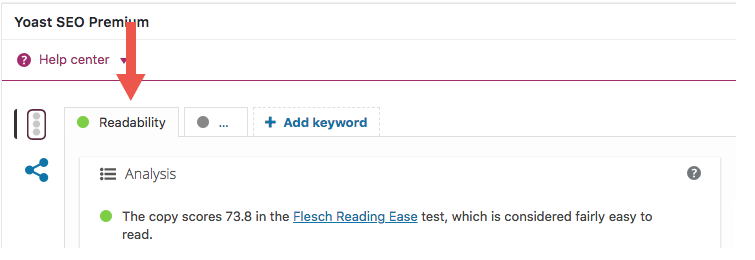
The Flesch Reading Ease Score
Come again?
The Flesch reading ease score will tell you if your content is easy for almost anyone to read—or if you’re being too uppity and most people will abandon it because it’s too “intelligent.”
We know Google takes that into account when ranking your content so it’s something you want to pay close attention to.
This is because, if it’s too difficult to read, your bounce rate will be high and the time spent on page will be very low. This signifies to Google that the content isn’t worth ranking.
While we often want to sound smart in our content, this can work against you.
You want to score between 60 and 100, which means it’s easily understood by an 11-year-old (and older).
If your score is between 60 and 70 (easy enough for 13- to 15-year-olds to understand), you’ll be doing just fine.
To get an automatic score, install the Yoast plugin (if you’re on WordPress) and it will tell you in the readability tab.
Do Keyword Research
The next thing you want to do is keyword research.
I always do this after the content is produced because it forces me to write for humans first.
The only exception is when we have a series (such as the content creation one mentioned above) or when we’re working from a content map.
In those instances, the keyword research has been done ahead of time.
But if I’m producing content that is more timely or I’m on my soapbox or I’m answering a question from our readers or community, I do the keyword research after the content is produced.
For instance, I think the keyword for this article is going to be “blog checklist.”
But I haven’t done any research to figure out if that will work. You’ll know if that changes by what’s in the headline when you read this.
The aforementioned content creation series will also teach you how to do keyword research.
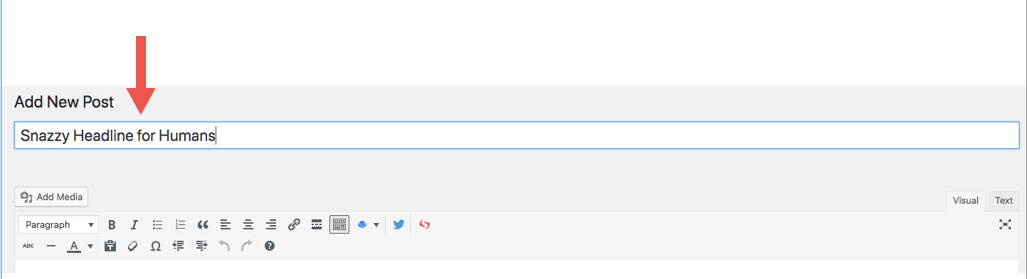
Write a Snazzy Headline
The headline you choose for the article can be different than the headline you choose for robots.
When writing for humans, your headline should pull in the reader.
And, in today’s world where headlines pass a person’s screen in literally the blink of an eye, the headline should be something interesting.
It does not have to include keywords or be structured the way your SEO headline will be (see below).
The idea here is to make it interesting.
Recent data from BuzzSumo shows that the phrase “watch what happens” and statistics do really well in headlines.
You’ll notice I’ve used “watch what happens” in Gin & Topics a few times to, well, watch what happens.
If you aren’t confident in your headline choices, you can use the CoSchedule Headline Analyzer, or check out these other headline tools.
The snazzy headline for humans goes at the very top of the article.
Write Subheads
Now it’s time to make it easier for your reader to, well, read your content.
Notice how I have subheads for every step in this blog checklist?
That’s so it’s incredibly easy for you to scan this article (because it’s a beast) and find what’s most important to you at the moment.
Even if you don’t read everything I’ve written under each subhead (sob!), you’ll get the gist of the article.
What’s more, the images will help you do the work without reading what I’ve written (sob!).
Make it ridiculously easy for your readers, listeners, or viewers to scan and absorb the information.
They can always come back for more, after you’ve proven the information is extraordinarily valuable.
Try for a subhead every 250 words, or so.
Add Images
You’ll notice with the images that we use here that each one has the Spin Sucks logo on them.
That is because branding is important.
You would not believe the number of people who use the PESO Model graphic and cut out the branding so they can pass it off on their own.
We learned that lesson the hard way.
Today we use a watermarked logo so, if anyone cuts out our log on the bottom (and they do), you can still see our branding in the middle.
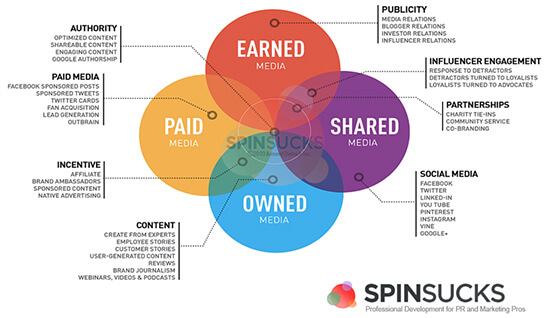
Use Creative Commons images (we love Pixabay) and Canva to create images that can’t be copied by everyone else on the web.
I’m quite pleased with the Creative Commons photo I used to create this glorious image:

Add Formatting
Now it’s time to format your content. This is less important for podcasts or videos, but incredibly important for everything else.
Use bullet points, lists, call outs, click to tweet, quotes, and more.
Like subheads, this provides an easy way for your reader to scan your article.
If your design allows for color (ours does not, but will when we relaunch next month), add it where you can.
Ideally, your links automatically turn a color that matches your branding so you don’t even have to worry about it.
Internal Links are Important
Though pretty much everyone will scan your article, they will click on links and go down the rabbit hole you send them.
That is why internal links are incredibly important.
You want to point readers to more information about the topic they’re reading on your site.
This encourages them to stay on your site, which helps you begin to build trust with them.
They’re also important if your content is syndicated (good) or scraped (bad).
If it’s syndicated, the internal link will help drive people back to your site.
If it’s scraped, it will alert you that someone has stolen your content (and drive people back to your site).
Include at least one internal link in every article you write.
Examples, Case Studies, and Testimonials
The last thing on your blog checklist when writing for humans is to include examples, case studies, and testimonials.
Often, when we publish articles here, we’ll say, “When client A did XYZ, they had these kinds of results.”
We don’t do the formal PRSA templated case study or the “You guys are great!” — Kylie S., Ogden, Utah type of testimonial.
We wrap the information into the content.
If it makes sense to include more details, we do.
But this is about writing valuable content for human beings.
And no one—I mean no one—wants to read your formal case study.
Wrap the information into the content and it’ll be a win.
Next Week: The Blog Checklist #2
Next week, we’ll go through writing for robots and why they’re important, too.
In the meantime, don’t get scared by how much is here. The process for doing this takes less than five minutes. Less time than it probably took you to read it.
If you have questions about how it works or don’t fully understand one (or more) of the steps, the comments are yours.