My team was working on an activity tracking application and wanted to be able to display segments of time on a radial gauge. When implementing this feature, I initially tried using some libraries specifically designed to build arcs, but I was disappointed by their lack of flexibility. When my pair recommended looking into SkiaSharp, I was pleased to discover that not only could I build a radial gauge, but I also had quite a few options as to how to build it.
In this post, I’ll start with a brief introduction to SkiaSharp, give a simple example of using it in Xamarin.Forms, and then explain how I used SkiaSharp to create a radial gauge.
What is SkiaSharp?
SkiaSharp allows you to draw pictures for mobile apps. More specifically, it can be used to draw 2D graphics in Xamarin.Forms.
SkiaSharp is powered by an open-source Skia graphics engine originally developed by Skia, Inc. and acquired by Google in 2015. The Skia graphics engine is now used for Google Chrome, Android, Mozilla, and other Google products.
Using SkiaSharp in a Xamarin.Forms Project
The SkiaSharp library can be added to a cross-platform Xamarin.Forms project as a Nuget Package. After adding it to your project, you create a surface or “canvas” to draw on. Then you can draw an image or text on that surface.
Assuming you are creating a Multiplatform Xamarin.Forms app, the first step is installing the SkiaSharp Nuget Packages. Install the SkiaSharp and SkiaSharp.Views.Forms packages to all of your projects (both the shared project and the Droid/iOS projects).
Then, using either Xamarin.Forms or C#, create a canvas where you can do your drawing. To create the canvas in XAML, first register the SkiaSharp assembly by adding Skia to the namespaces defined at the top of the file. Then, add a SkiaSharp Canvas View to the page. I gave my canvas the name “canvas” and set PaintSurface (the event handler that does the drawing) to OnPaintSurface.
<ContentPage xmlns="http://xamarin.com/schemas/2014/forms"
xmlns:x="http://schemas.microsoft.com/winfx/2009/xaml"
xmlns:local="clr-namespace:SampleSkiaCircle"
xmlns:skia="clr-namespace:SkiaSharp.Views.Forms;assembly=SkiaSharp.Views.Forms"
x:Class="SampleSkiaCircle.SampleSkiaCircle">
<skia:SKCanvasView x:Name="canvas" PaintSurface="OnPaintSample">
</skia:SKCanvasView>
</ContentPage>
The event handler (in my case, OnPaintSample) is where you specify what you would like to draw. It is implemented in C# and receives a sender of type object and arguments of type SKPaintSurfaceEventArgs. The info property of the arguments has information on the drawing area, and the surface property or arguments let you access the canvas created in XAML.
Drawing Shapes with SkiaSharp
Drawing a circle
To test the drawing capability, I decided to make a circle. I used SKPaintSurfaceEventArgs to initialize the the height and width of my drawing surface (via the info property) and to access the canvas (via the surface property). I then used those variables to compute a radius for my circle.
//get the canvas & info
var canvas = args.Surface.Canvas;
int surfaceWidth = args.Info.Width;
int surfaceHeight = args.Info.Height;

int strokeWidth = 25;
//take half of width or height (whichever is shortest)
float radius = (Math.Min(surfaceHeight, surfaceWidth) * 0.5f) - strokeWidth;
To draw a circle with a border, I used two different paints, choosing the “stroke” style to create the border and the “fill” style to fill in the circle.
//clear the canvas
canvas.Clear();

//outer circle
var outerPaint = new SKPaint
{
Style = SKPaintStyle.Stroke, //stroke so that it traces the outline
Color = Color.DarkBlue.ToSKColor(), //make it the color red
StrokeWidth = strokeWidth
};
canvas.DrawCircle(surfaceWidth/ 2, surfaceHeight / 2, radius, outerPaint);

//inner circle
var innerPaint = new SKPaint()
{
Style = SKPaintStyle.Fill,
Color = Color.LightBlue.ToSKColor(),
};
canvas.DrawCircle(surfaceWidth / 2, surfaceHeight / 2, radius, innerPaint);
}
Drawing an arc
The original challenge that led me to investigate SkiaSharp was designing a radial gauge displaying activities throughout the day. Our code computed a list of segments to display along with the desired length and category for each segment. All I had to do was find a mechanism to draw those segments on the page.
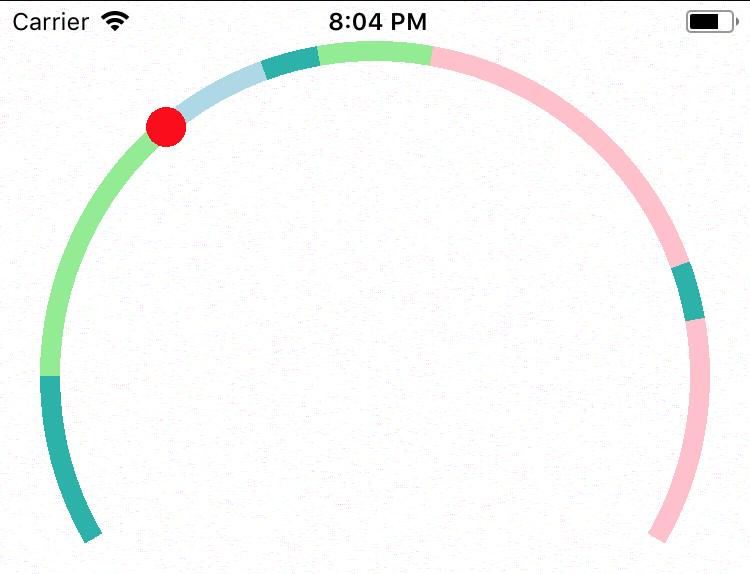
SkiaSharp ended up being a great fit for this because of its many options to draw arcs. My goal was to draw an arc that would display each segment in our list with the correct length and a color corresponding to its category. Additionally, I wanted to be able mark a point on the arc with a dot. I hoped it would look something like this:

SkiaSharp has a method called AddArc that, not surprisingly, adds an arc to a path. This method receives a rectangle determining the bounds of the arc, a start angle, and the “sweep angle” which specifies the length of the arc in degrees. AddArc uses these parameters to add an arc to an existing path.
Thus, one way to draw a radial gauge would be to create an individual path for each segment and add an arc with a sweep angle of the segment’s length and a color corresponding to the segment’s category. However, this approach would require drawing a path for each segment.
Instead, I decided to create a colored path for each category and then add all segments in a category to its respective path. I created a green path for category A and then added all segments categorized as A to the green path. Each time I added an arc to any path, I incremented a start angle variable and used that variable to determine where in the path to place the segment.
My pathA looked like this:

and my pathB looked like this:

When all of the segments are drawn “on top of” each other, they appear to be a radial guage.
Finally, in order to draw a dot in the desired location, I calculated the radius and then simply used sin and cosine to put the circle at my desired degree location.
var angle = Math.PI * (startAngle + positionOfMarker) / 180.0;

//calculate the radius and the center point of the circle
var radius = (originalRect.Right - originalRect.Left) / 2;
var middlePoint = new SKPoint();
middlePoint.X = (originalRect.Left + radius);
middlePoint.Y = originalRect.Top + radius; //top of current circle plus radius

surface.Canvas.DrawCircle(middlePoint.X + (float)(radius * Math.Cos(angle)),
middlePoint.Y + (float)(radius * Math.Sin(angle)), 20, circlePaint);
And with that, I had just the results I wanted.
Hi,
Can you please share the complete source code?
Thankd