
In Part 1 of this series, I laid the groundwork for setting up a custom decimal picker. In this post, I’ll show you how to finish styling the control. To make our decimal picker look just right, we employed some advanced CSS trickery.
Faking Out WebKit with Linear Gradients
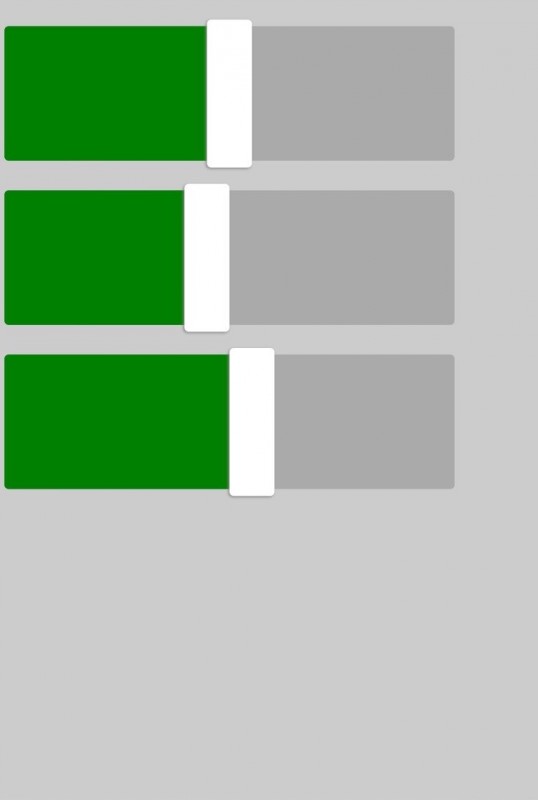
To reinforce the displayed value of each fader in our control and add some visual interest, we wanted to color in the section of track below each thumb control. In some rendering engines, this is really easy.
Unfortunately, WebKit is not one of those engines. To trick WebKit into displaying our filled-in faders, we used the CSS background property in a bit of a hacky way. Initially, we thought we might be able to specify two background colors and sizes.
input[type="range"]::-webkit-slider-runnable-track {
  background: green, #aaa;
  background-size: 50% 100%;  // Fill the first half of the track with green
}
As it happens, the background size rule doesn’t work with solid colors, only with images. Fortunately, we can trick the rendering engine into thinking that we’re specifying an image using a linear gradient. We don’t actually want a smooth grade—just a solid block of green, so we specify the same value for the start and end colors of the gradient.
Now that WebKit thinks we’re rendering a background image, it happily displays a fader track that’s half green and half gray. With that in place, we use a simple Sass loop to generate an appropriate background size for each potential notch in our faders. We’ll set the range-value-# classes in Part 3. The end result looks something like this:
@mixin fader-backgrounds($width, $min, $max) {
  $notch-width: $width / ($max - $min);
  @for $i from $min through $max {
    &.range-value-#{$i}::-webkit-slider-runnable-track {
      background-size: ($i - $min) * $notch-width 100%;
    }
  }
}

input[type="range"]::-webkit-slider-runnable-track {
  $fill: linear-gradient(green, green) no-repeat;  // Our pretend background image
  $background: #aaa;
  background: $fill, $background;
}

input[type="range"][min="0"][max="9"] {
  @include fader-backgrounds($width: $fader-width, $min: 0, $max: 9);
}

input[type="range"][min="0"][max="2"] {
  @include fader-backgrounds($width: $fader-width, $min: 0, $max: 2);
}
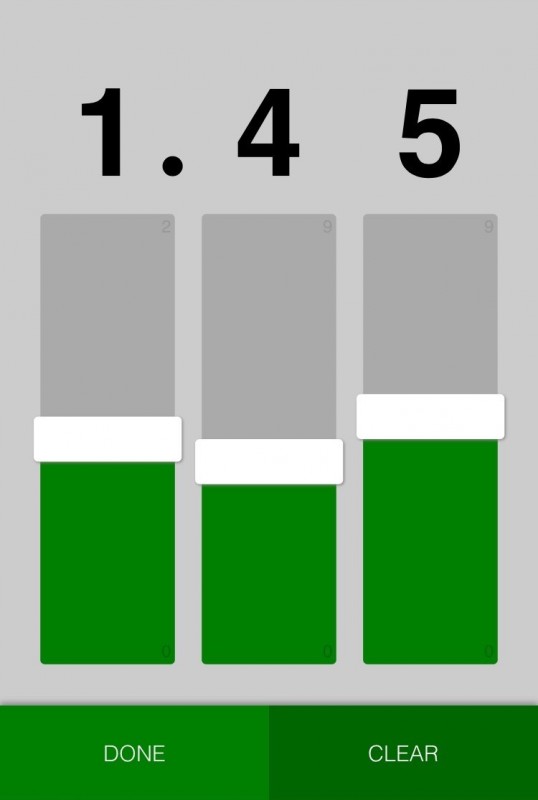
Turning the World
If you’ve been following along, you know we have a pretty large challenge to tackle. Our faders are currently horizontal, but the design calls for a vertical control. CSS to the rescue! We’ll just use WebKit’s built-in vertical setting.
input[type="range"] {
  -webkit-appearance: slider-vertical;
}

Go home, WebKit. You’re drunk.
But this is 2016. We have transform now! We’ll have to sacrifice just a bit of readability, but we can accomplish our visual goals with a little rotation. This one’s a bit…counterintuitive, so I’ll mark it up as we go.
// We'll need these later
$button-height: 175px;
$bottom-margin: 75px;
$faders: 3;

.decimal-picker {
  transform: rotate(270deg);  // Turn the decimal picker 90º to the left
  transform-origin: 0 50%;  // Pivot on the vertical center of the left edge

  // Properties that are calculated prior to the rotation
  $container-height: 100vw;  // The picker’s pre-rotation height will be its
                             // post-rotation width (100% of the viewport)
  position: absolute;  // You’ll get no help from the flow here
  bottom: ($container-height / -2);  // Pull the pre-rotation picker down
                                     // (eventually, to the right) by 50% of its
                                     // height (eventually, its width)
  left: ($container-height / 2);  // Pull the pre-rotation picker to the left
                                  // (eventually, up) by 50% of its height
                                  // (eventually, its width)

  height: $container-height;
  width: 75vh;
  padding-top: $gutter/2;  // Nudge the picker’s contents away from the
                           // (post-rotation) left edge

  // Properties that are calculated after the rotation
  margin: 4rem 0 0 0;
  margin-bottom: $button-height + $bottom-margin;
}


.decimal-picker {
  // We don’t want Webkit to flash an outline of our control every time a user
  // taps on it.
  -webkit-touch-callout:none;
  -webkit-user-select:none;
  user-select:none;
  -webkit-tap-highlight-color:rgba(0,0,0,0);
}


.digit {
  // A digit is a column consisting of a fader control and a value display
  margin-top: $gutter;
  float: left;
}


.fader {
  // A fader is a box for our input[type="range"] and the min/max value labels
  position: relative;
  height: $fader-height;
  width: $fader-width;
  float: left;

  .max-value, .min-value {
    position: absolute;
    transform: rotate(90deg);  // Since we want these to appear right-side-up,
                               // and their parent is rotated 90º to the left,
                               // we have to rotate them 90º to the right.
    font-family: sans-serif;
    font-size: 2em;
    bottom: -0.125em;
    z-index: 1;
  }

  .max-value {
    right: 0.4em;
    color: darken(#ccc, 20%);
  }

  .min-value {
    left: 0.5em;
    color: darken(green, 5%);
  }
}


.display {
  // A display is just a box for showing the current value of an input
  height: $fader-height;
  width: $fader-height;
  margin-left: $gutter/2;
  line-height: $fader-height;
  font-size: $fader-height - 2vw;
  transform: rotate(90deg);  // Since we want the value to appear right-side-up,
                             // and its parent is rotated 90º to the left, we
                             // have to rotate the display 90º to the right.
  text-align: center;
  float: left;
  font-weight: bold;
  font-family: sans-serif;

  .decimal {
    position: absolute;
    right: -1.5rem;
    font-family: serif;  // A square decimal point didn't quite fit here
  }
}

And Now, Some Buttons
After regaining our sense of balance, we’ll finish the visual portion of this control by adding “Done” and “Clear” buttons. Nothing too major here—just a bit of absolute positioning and some box shadows.
<div class="buttons">
  <button class="done">DONE</button>
  <button class="clear">CLEAR</button>
</div>
.buttons {
  position: absolute;
  bottom: 0;
  left: 0;
  width: 100%;
  box-shadow: 0px -5px 10px #888;
}

button {
  height: $button-height;
  width: 50%;
  float: left;
  border: 0;
  font-size: 2.5em;
  color: white;
  font-weight: 100;
}

.done {
  background: green;
}

.clear {
  background: darken(green, 5%);  // I ❤️ Sass
}
Next Step
In Part 3, we’ll wire up the dynamic pieces using Ember and work around WebKit’s errors in judgement with some custom event handlers and a little math.