When starting a new greenfield project at Atomic, we always ask ourselves about tooling surrounding testing and deployment. We have had a lot of luck with CircleCI for both mobile and web applications, so when I found out CircleCI had a solution for iOS, I was excited to take advantage of it. In this post, I’ll review how to use CircleCI with your iOS application and explain how I handled some bumps in the road on the path to CI and easy deployments.
So, what is CircleCI? In short, it’s a software-as-a-service platform for continuous integration and deployment. My goal with using CircleCI was two-fold:
- Continuous integration testing without having to maintain a server myself
- Easy deployments using TestFlight for our internal testers
I followed this excellent blog post explaining the process of getting up and running with CircleCI, and I highly recommend it for iOS developers interested in giving CircleCI a try. What follows is a step-by-step journal of my progress as I deployed a new app to CircleCI.
1. Create an Account
Log in to CircleCI and sign up. We went with the most basic OS X tier of server, which costs $40 a month. You can find complete pricing information here.
Log in and add your OS X repository to your CircleCI account. They have completely seamless integration with GitHub.
2. Share Your Xcode Scheme
In Xcode, make sure your scheme is shared, and commit the change:
- Choose Product > Scheme > Manage Schemes.
- Select the Shared option for the scheme to share, and click “Close.”
- Push the change.
For most applications, you can just share your main project scheme. If only one scheme is shared, CircleCI will choose it automatically.
3. Create and Upload Code Signing Certificate
CircleCI requires you to upload a provisioning profile and code signing certificate. Install the Fastlane tool suite to make this step easier and avoid having to muck around with Xcode. To create the signing certificate, run:
  $ mkdir certificates
  $ cert --output_path certificates
cert will create three files, including the .P12 file you need to upload. Again, refer to the blog post I linked to above (my instructions came directly from it). At this point, I hit my first problem:
  Password (for [email protected]): ***********
  [09:05:29]: Sending Crash/Success information. More information on: https://github.com/fastlane/enhancer
  [09:05:29]: No personal/sensitive data is sent. Only sharing the following:
  [09:05:29]: {:cert=>1}
  [09:05:29]: cert
  [09:05:29]: This information is used to fix failing tools and improve those that are most often used.
  [09:05:29]: You can disable this by setting the environment variable: FASTLANE_OPT_OUT_USAGE=1
  /Users/foobar/.rvm/gems/ruby-2.2.4/gems/spaceship-0.27.2/lib/spaceship/two_step_client.rb:39:in `handle_two_step': [!] spaceship currently doesn't support the push based 2 step verification, please switch to SMS based 2 factor auth in the mean-time (RuntimeError)
What’s happening here is Fastlane’s Spaceship tool doesn’t support Apple’s push-based two-step verification process, so when I ran cert, it failed, and I got a two-step verification challenge on my Macbook Pro. This turned out to be pretty annoying—the error message suggests switch to SMS based 2 factor auth, but I couldn’t figure out how to do this with my AppleID. I resorted to temporarily disabling two-step verification like this:
  Sign in to your Apple ID account page.
  In the Security section, click Edit.
  Click Add a Trusted Phone number.
  To add a number, enter the phone number and verify it with a text.
  To remove a number, click the X next to the phone number you want to remove.
If anyone knows how to switch to SMS for an iPhone user, I’d love to hear it.
4. Dealing with an Invalid Issuer Error
After disabling two-step verification, I hit another problem while generating the code signing certificate. Specifically, I had an expired Apple Worldwide Developer Relations Certificate Authority certificate. I had no idea this even existed. The fix for this issue is described in this Stack Overflow post. The solution is to delete the expired certificate in Keychain Access and download a new certificate from Apple.
5. Upload the .P12 File
Finally, cert succeeded, and I had a .P12 file to upload to CircleCI for code signing. You can upload the file by going to your CircleCI application and choosing Project Settings > iOS Code Signing.
6. Create and Upload a Provisioning Profile
The other file CircleCI needs to deploy your application is a provisioning profile. To create one, you can use the “sigh” tool:
$ sigh
sigh will create a file with a .mobileprovision, unless there is some problem. In my case, there was a problem. When sigh runs, it asks for a bundle identifier (which you should have given Xcode when you first created the project). In order for sigh to work, an app with that identifier needs to exist on the Apple developer portal. I hadn’t created the app on the developer portal yet, so sigh failed. There’s a command line fix to this problem:
$ produce -u yourappleid -a yourappbundle
The produce command creates a new app on the developer portal. After running produce my .mobileprofile file was created, so I added the file to the root directory of my repository and pushed the changes. During the build, CircleCI will automatically find this file and use it.
7. Configure circle.yml to Sign Your App
The final step is to set up the CircleCI configuration file to build and deploy your application. CircleCI can use “gym” to sign the application with the .P12 file you uploaded earlier, but it needs one more bit of information: the exact code signing identity string, which you can find by running security:
security find-identity -p codesigning
The output of this tool is a list of valid signing identities. Pick the appropriate one and copy the string (without the UUID). For example, it might look like this: "iPhone Distribution: YourCompany, Inc. (ABXU908T71)".
Now, add that string to circle.yml.
machine:
  environment:
    GYM_CODE_SIGNING_IDENTITY: "iPhone Distribution: YourCompany, Inc. (ABXU908T71)"

deployment:
  beta_distribution:
    branch: master
     commands:
       - gym
And add circle.yml to the root of your repo and push the changes. The above configuration tells CircleCI to deploy whenever changes are made to the master branch using gym, which is set up with the GYM_CODE_SIGNING_IDENTITY.
8. Deploy to iTunes Connect
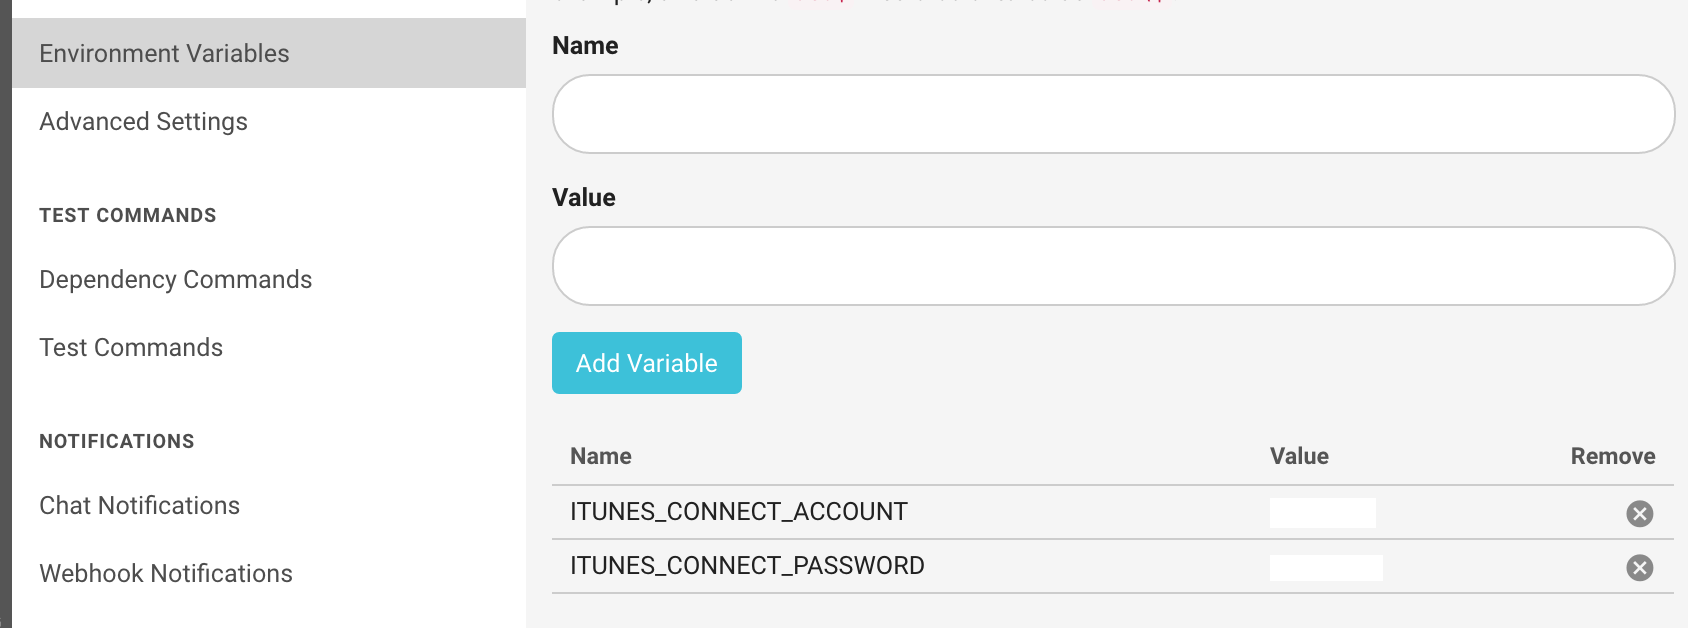
Finally, you are all set to configure CircleCI to deploy your application to iTunes Connect. To do this, you need to set up two environment variables in CircleCI under your app’s settings, ITUNES_CONNECT_ACCOUNT (your iTunes connect account username), and ITUNES_CONNECT_PASSWORD:
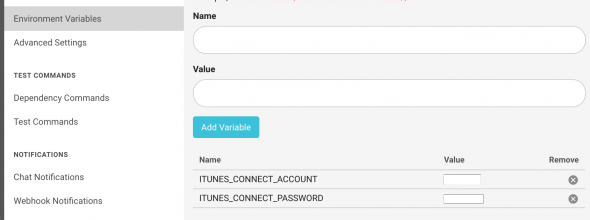 . CircleCI uses these credentials to run
 ipa, which will upload your successful build, provided all tests pass.
The other piece of information you need is your iTunes Connect AppleID, which can be found on the iTunes Connect website under My Apps -> Your App -> App Information -> Apple ID. This is a number that is passed to ipa with the -i option.
Finally, update your circle.yml again as follows:
machine:
  environment:
    GYM_CODE_SIGNING_IDENTITY: "iPhone Distribution: YourCompany, Inc. (ABXU908T71)"

deployment:
  staging:
    branch: master
    commands:
      - gym
      - ipa distribute:itunesconnect -i 8675309 --upload --verbose
At this point, everything should work, and you will be greeted with a green build in CircleCI–successful test and deployment! Visit iTunes connect, and there will be a new build under Activity. It takes a while for Apple to process the file, but once processing completes, the app is ready for testing and your TestFlight testers will be notified.
Conclusion
I spent a few hours working through some convoluted issues, but in the end, the pain was worth it. Now, every time a member of the team pushes a change to master (usually by merging in a feature branch), tests run automatically, and—if they pass—a build is automatically sent to testers. It’s a thing of beauty.